Wedding photography: Positioning the lighting for the groups & formals
In setting up the lighting for wedding formals in the church, the question often crops up – where do you place the lights. How far from your subjects do you place the lights.
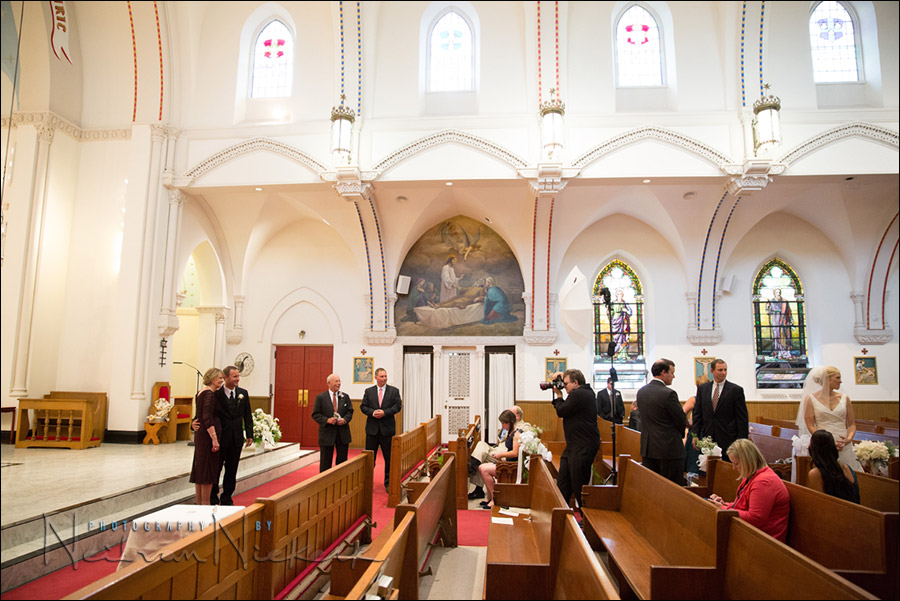
The photograph above shows how and where I place the flash with the umbrella – about 3 pews in, just behind me or to my left (or right). This is approximate though. Two pews in would be fine. Of course, if you’re shooting the wedding formals elsewhere in a different location, just use the same idea.
The closer you bring the light, the more you risk having the light come from too steep an angle, and giving you shadowed eyes.
In positioning my light here, I can be slightly forward of my light – no chance of lens flare – and I have proper perspective for full-length photos. You really do not want to shoot full-length portraits with a wide angle lens. Step back, rather than zoom in!
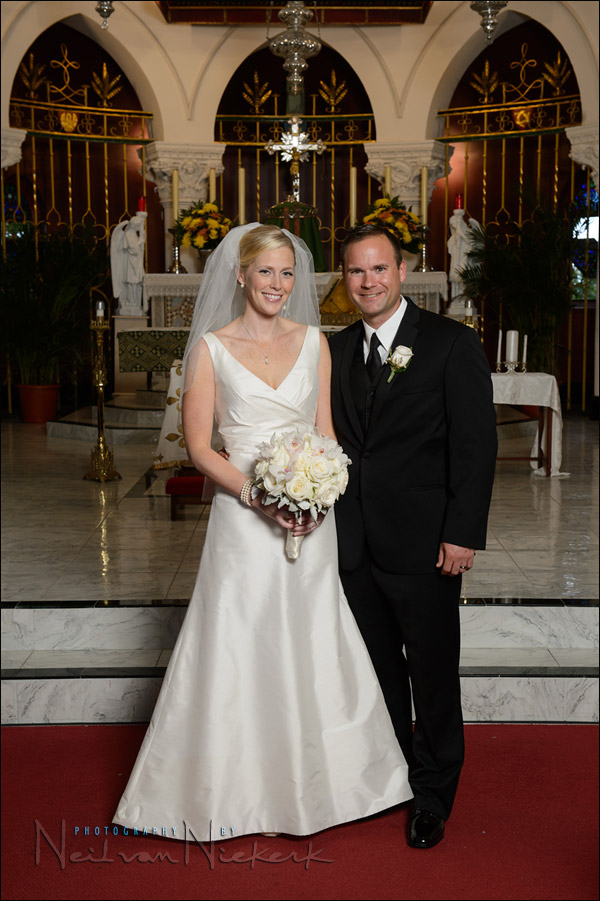
Placing the light relatively further back like shown here, does bring the light in at a fairly low angle – but it gives open, clean lighting. This is how it looks:
camera settings:
1/100 @ f/5.6 @ 400 ISO
Here I used two speedlights with the single 45″ shoot-through umbrella, to give a wide swathe of light. Both speedlights were gelled with 1/2 Straw CTS – 20×24″ gels (affiliate) to help compensate for the Incandescent lighting. I used the RPS Light Bar RS-3102 (affiliate) to mount the speedlights together, as described in this article: mounting multiple flashes / speedlites. Another alternative is the Triple Flash/Umbrella Mount (affiliate).
The light is spread quite even – even enough for a small group.
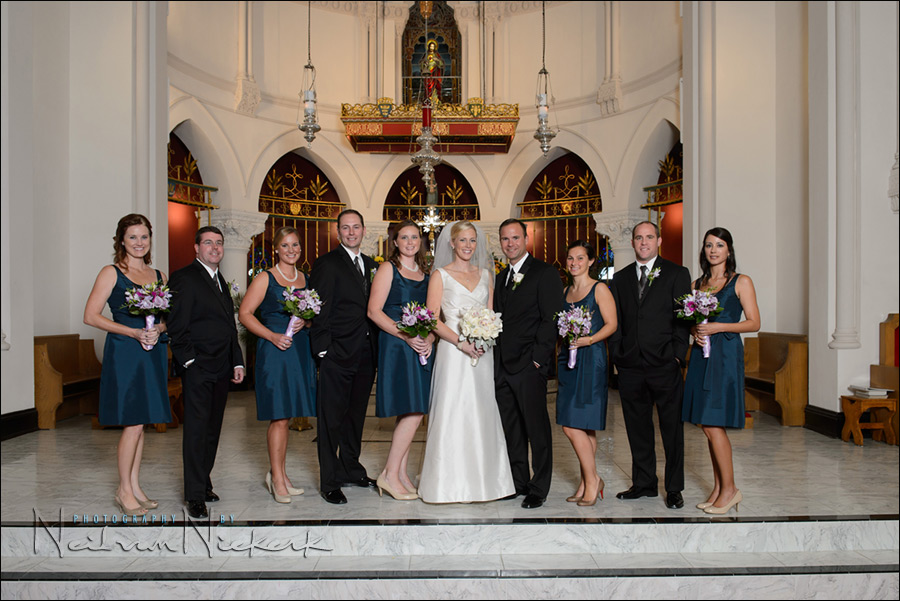
The lighting really is meant to be straight-forward. No cross-lighting. No weird shadows. In a large group, no one is half-hidden in someone else’s shadow. The light is meant to be quite flat. You risk few problems this way.
Photo gear used (or equivalents)
- Nikon D4
- Nikon 24-70mm f2.8G AF-S / Canon 24-70mm f/2.8L II
- (2x) Nikon SB-910 Speedlight / Canon 600EX-RT Speedlite
- (2x) Nikon SD-9 battery pack / Canon CP-E4 battery pack
- RPS Light Bar with Four Accessory Shoes RS-3102 to mount the speedlights
- Westcott 45″ White Satin Umbrella
- 1/2 Straw CTS – 20×24″ gels
Gelling your flash
To have the cold (blue-ish) color from your speedlight better match the warm tones from the Incandescent light, makes it easier to get good colors and white balance in your final images.

Related articles
- A simple lighting setup for photographing the wedding formals
- Using off-camera flash for clean predictable results
- The benefits of using off-camera manual flash
- further articles on Wedding Photography
- NJ wedding photographer
- Amy & Clark – wedding – Staten Island / Richmond County CC
Neil,
I assume you are using the 70-200?? Also how many people will you shoot with just ONE light?? How large does the group have to be before you add a second light?? ty, Mike
I would photograph a group staggered in two rows with this setup, but then I’d push the power of the flashes to maximum, and also raise my ISO to get the necessary depth of field.
I shot the photograph of the couple with the 24-70mm, but racked towards the 70mm setting.
Thank you for posting this. Yes, I’ve had shadow problems when putting lights on the side, even when having two lights (one left, one right).
My question is, what if the client wants a large group shot (say 20-ish people). Will the 3-pew distance be enough? If you use at least 50mm to get the group shot, will the light stand be in the way?
For larger groups, I might move the flash back a bit … but then I bump the ISO to give me more depth of field.
However, I do my homework, and if there are really huge groups – like such as in this article: lighting large groups – then I bring more powerful lighting.
Yes, my question also. I don’t shoot many weddings anymore, but used to set up two umbrellas for more even lighting for groups. Loved using one Starfish for couples and smaller groups, often placed closer to the front of the aisle so more of the church would be in the background instead of just the altar.
Hello Neil. Quick question: in the last photo, didn’t you feel the need to bump your ISO higher to add more ambient light to your background (plus flash would participate less via TTL)? Was it a subject-backround separation choice?
Yup, I could’ve done that. But I didn’t want to risk too much mixed lighting, even if I did gel my flash. But you’re right, a higher ISO would’ve brought in more of the ambient light. This would’ve made the background brighter.
I like to do a very similar setup with a just the slightest touch of on axis (hot shoe) fill.
may I ask if you could use TTL here or do you choose manual?
Neil – I would love to hear how you deal with flat marble or wood walls at the back of the sanctuary & the reflection/specular highlights you get in that situation. Thanks.
Mike, just for you: Mounting multiple flashes
Neil, in this particular image, you are using a shoot through. Would that be prefered over a 60″ bounce umbrella you’ve referenced in past posts?
That would work too. It would probably be a lot more efficient than the shoot-through umbrella that bounces a lot of light back into the room.
oh that’s exactly how I do but I’m too lazy for an umbrella. I just zoom the flash out all the way & at 1/8 of the power at pretty much the same settings on the camera.
Neil,
Can you share the set up for the two flash units with one umbrella?? two flex tt5s??? what bracket did you use?? thanks
This is quite a challenge!
Here is an example where I placed two flashes (Quantum flashes), high up and behind me. This way I didn’t see the specular reflections in the wooden paneling.
I found this video interesting:
https://fstoppers.com/wedding/how-light-wedding-posed-pictures-church-3997
Basically he bounces studio strobes into the church to get beautiful clean light.
Is the image of the couple cropped? (It may not be but for some reason looks like one; just idle curiosity.)
It should be full-frame, however, I do straighten the formal photos as part of my regular post-processing workflow. So there might be slight cropping because of that.
Hi Neil,
I am really enjoying your writings. I am to take photos at a family wedding later this month and I plan on using the one umbrella approach you have. My question is – did you set the flash heads at any particular zoom level, or did they zoom based on your lens zoom? Would it make sense to put both flash heads at 35mm for a broader spread of light? And you used four flashes in this case?
Thanks.
I zoom the flash-heads so that they don’t spread the light wider than the edge of the umbrella.
Keeping it to 35mm (or 28mm) is a good setting for this.
“Here I used two speedlights with the single 45? shoot-through umbrella, …”