
Bounce flash portrait – a consistent technique
WPPI 2012 took place during the past week – as always, a crazy-hectic and exciting event. I once again presented a Master Class at WPPI. But I also took time to present a private mini-workshop to the first 3 people that signed up. We went over a condensed version of my full-day workshop, covering most of the material in the 4-hr long mini-workshop. Like last year, I called on my favorite model in Las Vegas, Shawna. Actually, she has since moved to L.A. but she was quite happy to make the trip back to Las Vegas to be our model.
The start of the practical part of the flash photography workshop is always on-camera bounce flash. For this article, I thought I’d use some of the demo photos, to show that there is a consistent technique here. A consistent approach that guarantees at least a successful basic portrait with nice light and a pleasant background.
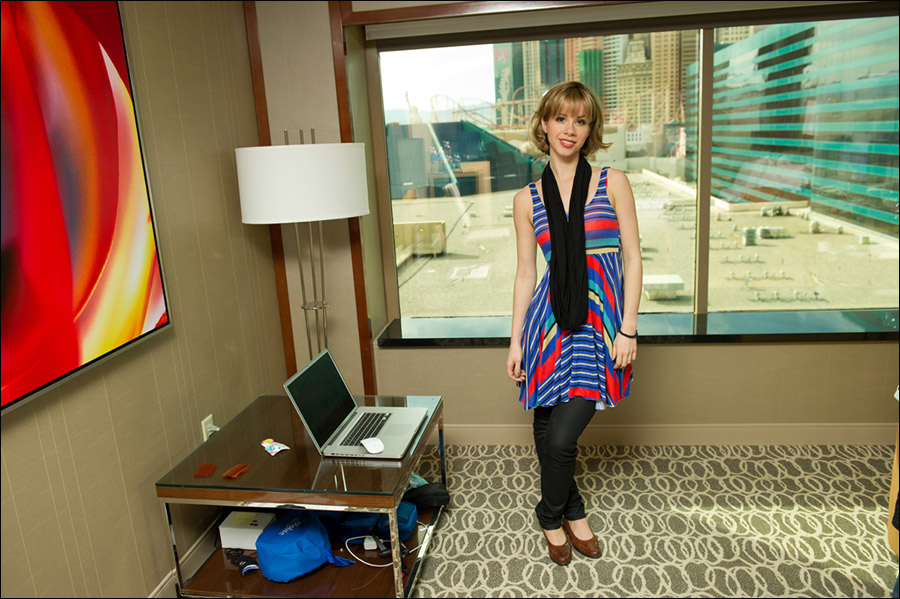
The pull-back shot to show where we were shooting during this part of the mini-workshop – my hotel room. Nothing extraordinary there. But by eliminating everything you don’t want in the frame, and choosing a specific background, a simple flattering portrait is easily achieved.
1. Find your background
One thing I’m particular about, is that my background should be complementary, or non-intrusive. A fast telephoto zoom is an indispensable lens for me in compressing the perspective when shooting a portrait.
- Effective on-location portraits (model: Anelisa)
- Photographic composition – eliminate & simplify
- Wedding day portraits – simplifying composition for effect
- Photographic composition – eliminate & simplify
- Wedding day portraits – bride & bridesmaids
2. Base your ambient exposure on your background,
assuming your subject is under-exposed, and you can pick up the exposure of your subject via additional light such as flash.
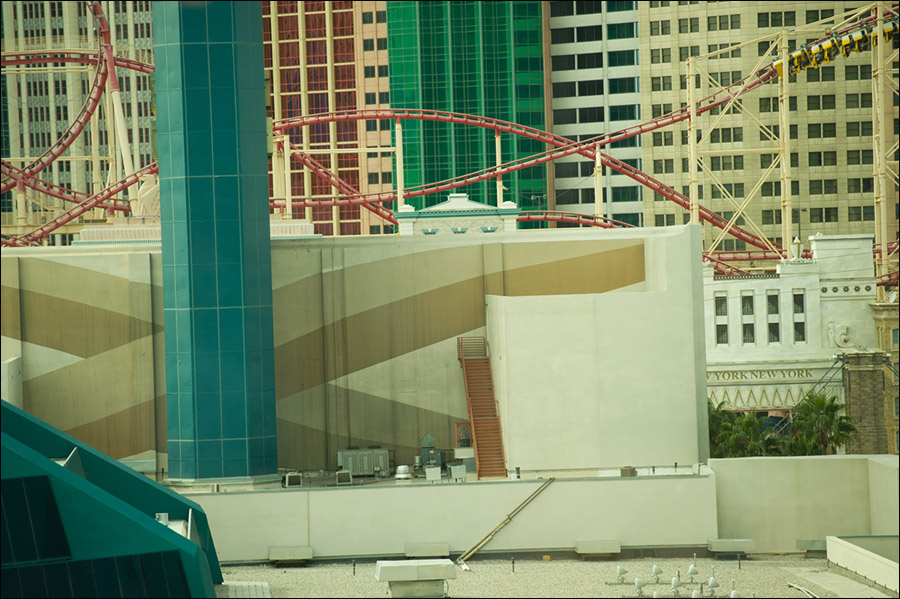
I wanted the background to not blow out (via over-exposure), or be too dark. So I metered for the background, zero-ing my exposure meter in my camera, while looking at just the background. The turquoise tint here is due to the green-ish tint to the windows of the MGM hotel.
3. add light to your subject – in this case, on-camera bounce flash
If I hadn’t based my exposure specifically off the background, but chose random settings, the TTL flash exposure would still give me correct exposure for my subject. This is important to realize – TTL flash exposure will follow your camera settings.
1/80 @ f3.2 @ 800 ISO
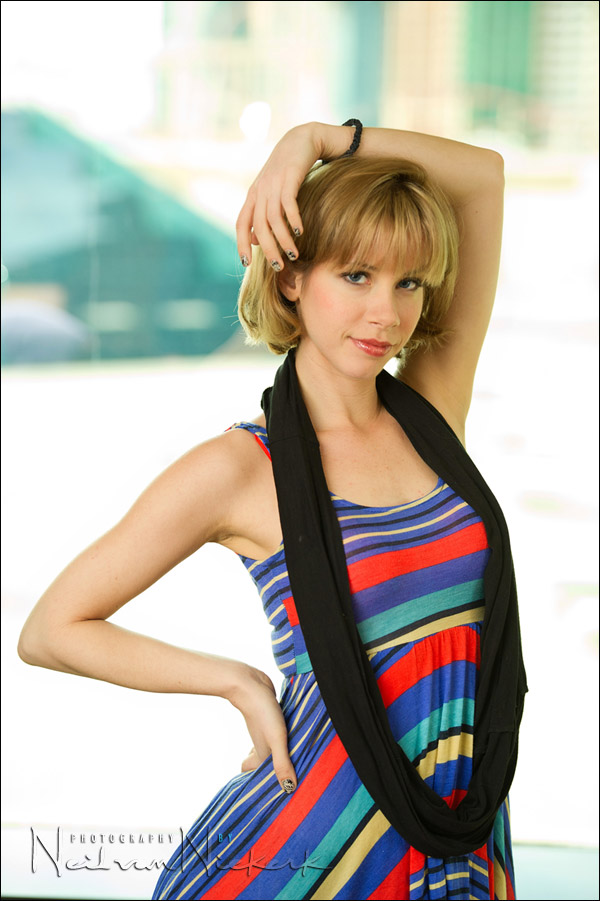
Back to the final image – having metered for the background, I set my camera to:
1/250 @ f4 @ 800 ISO … and the TTL flash exposure adjusted for the change in settings to still give me correct flash exposure.
For the light, I used on-camera bounce flash, which I flagged with the black foamie thing (BFT) to give me short lighting.
Just to make a note about the background again – I framed tightly, and I crouched slightly, so I could avoid the bland rooftop areas which were industrial looking, and not attractive. So I specifically framed Shawna against the out-of-focus fake-New-York skyline there in Las Vegas. The colors and shapes aren’t intrusive, and helps in giving the final photograph even more color.
There isn’t much more to add about the flash photography itself since I used TTL flash. The TTL exposure mode, as controlled by the camera & speedlight, helps considerably in making flash photography easy where I can concentrate on the final image. If there had been under- or over-ecposure, I would simply have adjusted my Flash Exposure Compensation up or down.
There it is – a consistent approach that gives me a basic portrait that always works. A good starting point.
Related articles
- Black foamie thing
- Tutorial: Bounce flash photography
- Video clip – using the black foamie thing
- Bounce flash with and without the black foamie thing
On-camera flash modifier – the black foamie thing

The BFT is held in position by two hair bands (Amazon), and the BFT is usually placed on the under-side of the flash-head.
The linked articles will give clearer instruction, especially the video clip on using the black foamie thing.
I’v been your fan since 2010 and learned lot’s of flash skill from this site.Thank you!
Thanks Neil. Great portraits from what appears to be a limited setting. Food for thought for me..
Another great post, Neil. After reading it, I still couldn’t quite figure out the positioning of the BFT in relation to the subject, flash, and bounce surface. Then I found this little gem on flickr from you in response to a question that cleared it up perfectly:
“… you point your flash towards the area you want your light to come from. And then you use the BFT to flag any direct flash from falling on your subject.”
Hey Neil, thanks for the great info. I’m using a d90 w/ sb700 and am fairly new to this so could you give me a few pointers?
-How do you meter for the background but focus on the subject, are you using AF or MF?
-And for the flash, are you just bouncing off the ceiling in this shot?
Thanks!
Interesting article. One question. You used the BFT, so what is causing the catch lights in her eyes?
Neil did you use your Nikon pocket wizard
Such a simple technique and such great results. The catchlight comes from the flash bouncing off the surfaces – the ceiling and/or walls.
Neil,
Thank you for the excellent workshop! For having followed your blog and read both your books, there were still plenty of “Aha!” moments throughout the day. Definitely a worthwhile investment that left me with a lot of food for thought.
And I’m glad you didn’t end up hitting those two girls in public; 90% of the people on the Strip had cameras this week, so that could have been bad.
-Anthony
Neil,
This is one those great posts that summarizes the detailed bounce flash knowledge you have posted in the past. People really ought to bookmark this.
It’s definitely good that you still use the BFT for your workshops to show that you can still get fantastic photos with low-tech items.
Neil,
Like Anthony, I really enjoyed the workshop. I appreciate the time you put into your presentation and the one on one time you spent with each of us. It was a real bonus to have a beautiful model that we could shoot in various conditions. Thanks again for the experience.
Steve
Hey Neil,
great post.
Is it the BFT the prevented any glare off the glass window, since no direct flash was hitting it?
Thanks
Jay
Neil,
Since you use a telephoto, did you bounce the flash off of the ceiling and left wall IN FRONT of where you were standing?
Thanks Neil,
Have you found any TTL mode more consistent than the other for bouncing – plain TTL, or TTL BL?
For the final image did you direct your flash over your shoulder to the left?
Neil – great post…
What flashgun did you use?
If it was a Nikon – was it TTL or TTL-BL?
I’m probably being stupid here with these questions, the 4th shot had these settings – 1/80 @ f3.2 @ 800 ISO – that was just shooting to expose the subject correctly without any care for background?
However the fifth shot had these settings – 1/250 @ f4 @ 800 ISO – that was the correct exposure for the background? and you simply added fill flash to that?
Finally hwy do you shoot at ISO800 as opposed to ISO400? Is that just so the flash doesn’t ahve to work as hard?
Thanks
M
Thanks for the article, Neil. I recently discovered your blog and became an instant fan. In fact, I’ve just purchased both of your books and look forward to reading them.
In trying to shoot a scenario similar to this I’ve run into the situation where if I meter for the background using my camera’s fastest sync speed of 1/250, I have insufficient bounce flash power to properly expose the subject. Is there a way around this, other than find a less bright background?
I shoot with a 580EX II and a 7D.
Thanks,
-Mike
Neil, you have the gift or ability of “using creativity to find backgrounds where none seemingly exist”. The links in this article, under “1. Find your background”, shows it clearly. These are inspiring articles, as it provide solutions to a nightmare type problem.
I believe you can write an excellent book on composition. Your flash photography books are one of a kind (nothing else compares with it), and I believe you can do the same with composition & backgrounds, with a focus on practical implementation, using flash where necessary.
Hi Neil, another fab article. Just want to clarify. Meter the background until it arrives at the tones and brightness you want but was the flash dialled down or left with zero compensation?
Cheerio
Neil – Thanks for taking the time to respond.
Martin
Neil,
When we brought up our pictures we did at your workshop in Vegas, the background of the MGM/New York colors were more blue than green but Shawna’s skin tones were similar to yours. Was that because I was at a Tungsten white balance with the CTS gel on the flash and this makes the open shade outside blue? Thanks in advance for the comments and again for a great class.
Steve
Um, Neil?
Stay behind the camera!! ;)
Neil:
I am fairly comfortable with your bounce techniques except for the white balance settings The skin tones here seem a little warm for the flash setting but the daylight portion seems “normal”. Did you use a CTS gel to warm the skin tones or change white balance to cloudy. If you are writing another book for my collection could you expand it to include more of your white balance techniques?
Gene .. I have the skin tones here quite warm. That’s my usual preference. I think I take it too far some times though.
Now, regarding the idea that the skin tones here are too warm for Flash WB, but daylight seems normal … keep in mind that I shoot in RAW. Therefore the idea of a specific WB preset on my camera, falls away. I can change my WB to anything afterwards. And I do adjust the WB as a matter of course with my post-processing of the RAW file.
I didn’t use a 1/2 CTS gel here, but as one of the workshop attendees mentioned, he did, and the background color was different as a result.
And yup, I am busy with my next book!
Neil regarding comment number 23s last question u could have shot at iso 200 and used a 1/60 of a sec. to get the same exposure, as long as ur speedlight is powerful enough, which it should be if its an sb910
Hi Neil,
Currently enjoying both your books as well as the website!
You strongly recommend a fast telephoto zoom, but what typical length are you using in this type of photo please?
I am looking at the 80-200mm F2.8D as I cannot afford the 70-200mm VR-II but as I have a crop sensor DX (Nikon D7000) I am concerned it may be too long for many rooms.
Are the effective 105mm (70×1.5) and 120mm (80×1.5) minimum fields of view going to be a little unwieldy indoors in rooms like this and other this examples?
Would the older 35-70mm F2.8D or a 85mm F1.8 be a better starting point?
Kind regards
Ivan.
Learning a lot from reading comments and questions, but being quite new to this, there is something I’m not sure I understand. Why ISO 800 with such a bright background?
Hi Neil,
you said… “I was bouncing my flash slightly towards her, by bouncing off the wall and ceiling above her (and to camera left)” so, are you bouncing flash off the browish wall and bold coloured print as seen in your pull-back shot and if so I would have expected a colour cast on your lovely model?
Thanks for making the time for your excellent blog, when are coming to Australia to run a workshop?!
thanks, so I guess you set WB on about 3700 K rather than AWB or daylight 6500K so that the resulting image in camera would look fairly ‘normal’ then tweak if required in post production? Do you bother with colour checker cards or would you use white of her eye to set white point in post? (I am red-green colour ‘blind’ so I like to use a colour checker when I remember).
Hi Neil,
I’m starting to grasp the technique of bouncing my flash, but my question is, What happens when the walls and ceiling are not white, as was the case a few weeks ago, when I found myself in a room with Red and Yellow (Mustard) colored walls. Thanks, Bob
hi,
i am new to photography.
how do you get this number ?
Having metered for the background, I set my camera to:
1/250 @ f4 @ 800 ISO
I want to know how to do metering ?
thanks,
regards
Aditya
Aditya … exposure metering tutorial
Hi neil,
i have been following your tutorial and i already fill up my handphone screen of shortcuts of your tutorials…hahaha…and it helps me a lot and continue learning from it.
Thanks a lot Neil.
By the way any chance coming over here at singapore please let me know i just wanted to learn more from you in person..
Are your photos bounced off the wall or off the ceiling? I presume from looking at them they are boucned off the wall but it would be good to have it confirmed.
Hi there Roger
What I try to do whenever possible when bouncing my flash, is to bounce my flash into the direction that I want the light to come from. Not necessarily a particular wall or the ceiling – but the DIRECTION that I want the light to come from.
Here are 3 more articles that explain it in more depth:
– Which direction to bounce on-camera flash?
– How to bounce your flash
– Bounce flash tutorial