Photographing in bright sunlight – find the shade!
Hard sunlight must be one of the most difficult lighting scenarios to work under. But with a bit of thought, we can work around it and still easily get photos that look great. It’s a topic that we’ve touched on a number of times on the Tangents blog, (see related articles at the end here). Where I can though, the simplest approach for me though, is where I can, is to just not deal with the hard sunlight. I find shade.
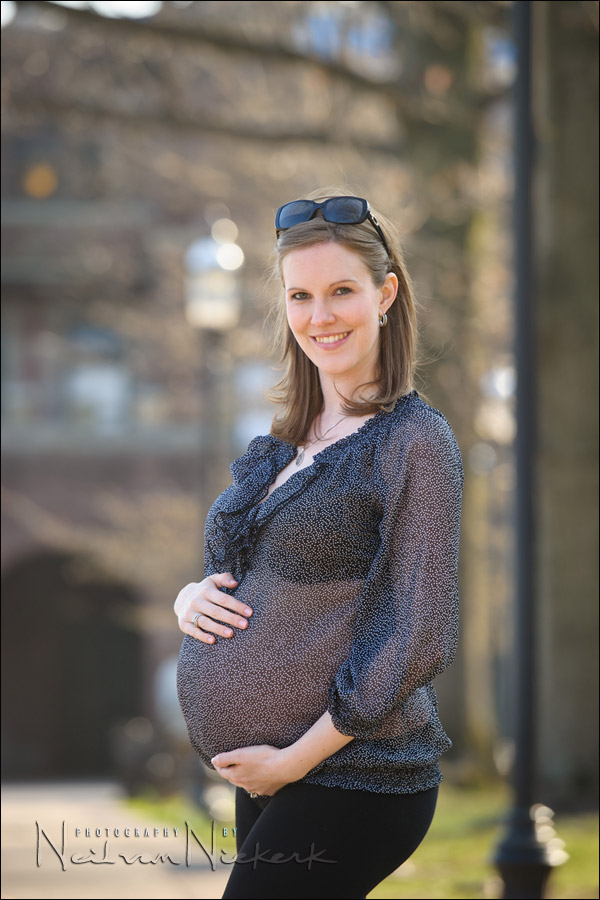
This maternity portrait session of Amy was taken on a bright day, and I wanted to avoid her squinting in the bright light, and I also wanted to avoid dealing with hard shadows and light across her face. I much more prefer clean open light. It’s more flattering.
I posed her in the shade of a tree trunk. That slender bit of shadow is enough to avoid hard light.
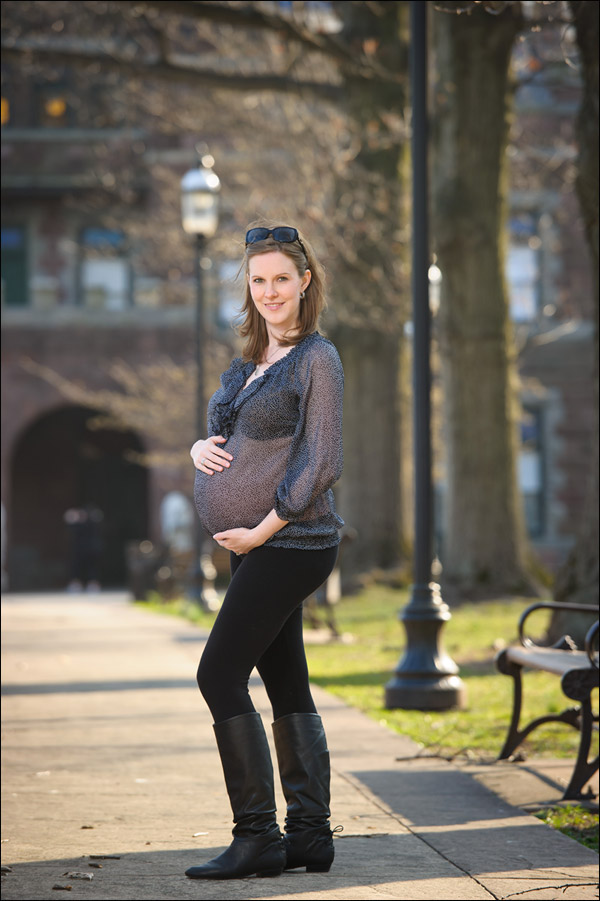
Now, I could’ve chosen to expose correctly for her just by the ambient light alone. But I used off-camera flash in a softbox to get really nice soft light on her. Nothing dramatic or complicated. Just simple flattering light.
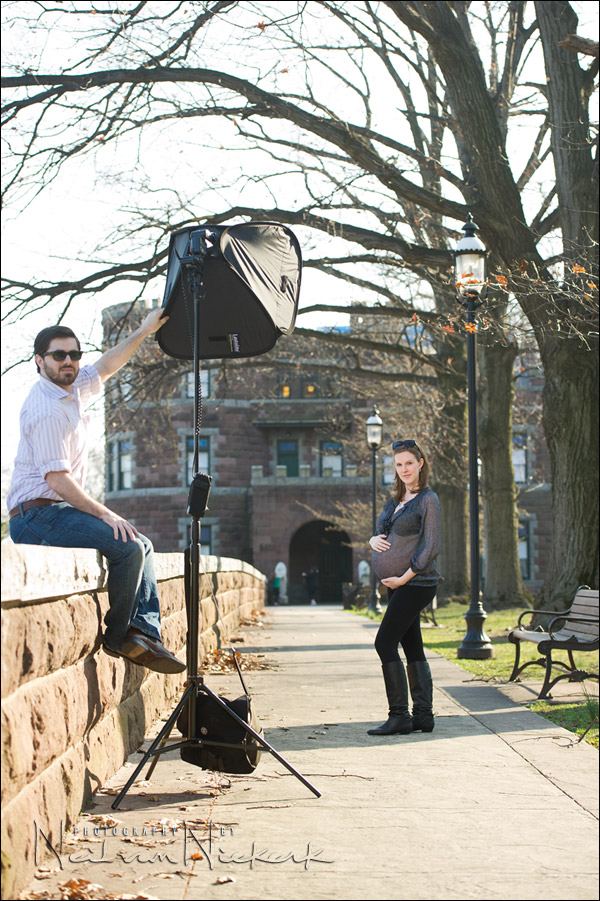
Here is the pull-back shot, showing Amy’s husband, Nick making sure the light-stand doesn’t blow over on this gusty day. I did do a few portraits of them together, and just shot quickly and hoped my light wouldn’t go tumbling over. The bag there did help weigh it down.
So in the final sequence of photos, where I am shooting close-ups of Amy, there is nothing to reveal that she is standing in that sliver of shade. And the light is great.
Camera settings & photo gear (or equivalents) used during this photo shoot
- camera settings for the image at the top: 1/250 @ f/4 @ 200 ISO
- Nikon D3s
- Nikon 70-200mm f2.8 AF-S VR II / Canon EF 70-200mm f/2.8L IS II, used @ 165mm
- Lastolite EZYBOX 24×24? softbox
- Manfrotto 1004BAC – tall light-stand
- Nikon SB-910 Speedlight controlled by PocketWizard FlexTT5 Transceiver & AC3 Controller
or alternately, the Canon 600EX-RT Speedlite controlled by Canon ST-E3 Transmitter

Direction & Quality of Light
I wanted to distill the essence of what we, as photographers, work with – light! Before we can truly grasp on-camera flash and off-camera flash, and really, any kind of photography, we have to be aware of the direction and quality of light. We need to observe the light that we have, and then decide how best to use it, or enhance it.
With this book, I try my best to share those “aha!” moments with you, and I do believe this book can make a difference to your photography.
The book is available on Amazon USA and Amazon UK, or can be ordered through Barnes & Nobles and other bookstores. The book is also available on the Apple iBook Store, as well as Amazon Kindle.
In that previous instance, I had used off-camera flash in a softbox to sweeten the available light. But the same thought-process can be used if you want to use only the available light.
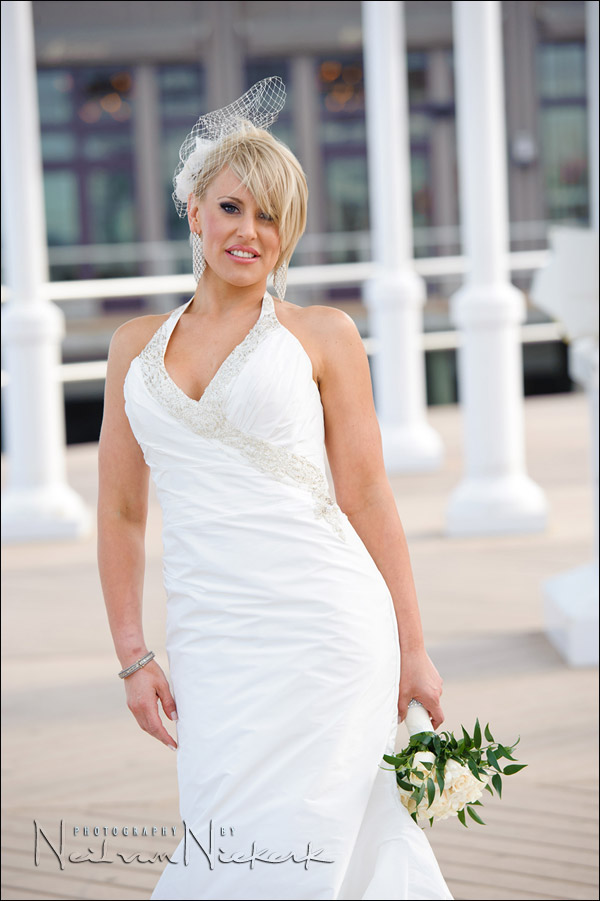
With this portrait of Rachel, I also had to deal with sun coming in and out behind a thin layer of clouds. It was alternately bright, and then very bright. So I posed her in the narrow shadow of one of the pillars.
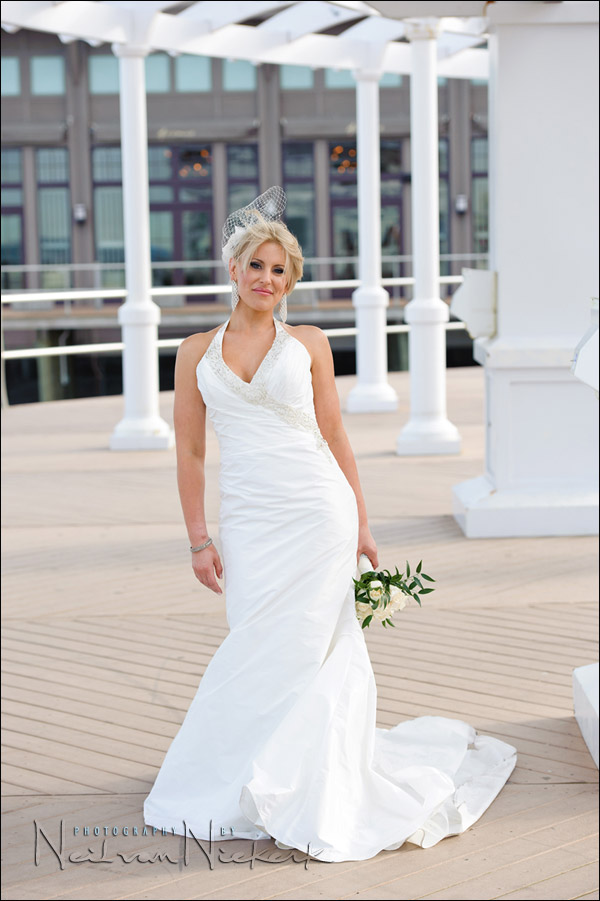
Now in this case, because I didn’t use off-camera lighting – or any kind of additional lighting for that matter – I have to make sure I expose correctly for my subject, the bride. The background exposure is now out of my control. The tonal values for the background will fall where they may. However, I do make sure that the background is complementary, and not distracting. It’s not arbitrary. It’s a specific decision.
- camera setting: 1/640 @ f4.5 @ 400 ISO
- Nikon D3s
- Nikon 70-200mm f2.8 AF-S VR II / Canon EF 70-200mm f/2.8L IS II
In terms of how I decided on my exposure – exposure metering for the bride & the bride’s dress.
So here is a pragmatic method – my first approach – in dealing with hard sunlight. I work around it. Only if I’m stuck, then do I figure out alternate ways of shooting in bright sunlight.
Related articles
- Technique – taking photos in hard sunlight
- Lighting for on-location photo sessions – pick your battles
- Off-camera fill-flash in bright sunlight
- Photographing in hard sunlight with on-camera flash
- Exposure metering – exposure for your subject
- Using the available light is not random thing
Neil, I’ve noticed that you use external light (like a softbox) a lot on location. How often do you get chased out by the Blue Meanies? It seems that every time I do a senior portrait outside, I’m getting told to leave. With one young lady, we were chased out of an alleyway, a wharf, and a marina. I typically don’t use a lot of equipment, preferring to use available light. I may have a tripod, and mom holding a reflector. I envy you.
I’ve had my share of hassles with the cops, but I generally avoid having to deal with any kind of officialdom. Meaning, I choose my battles. :)
A question: In the second sequence, if you had opened up a little more, you would have lost the details of the dress, correct? But this would also show her eyes a little better? This is just a trade off when shooting in natural light?
I appreciate your posts a ton. They are really great!
It isn’t so much the exposure, since the exposure is good. But if you need more light in certain areas, then you need to add the additional light where you want it, whether off-camera flash or on-camera fill-flash or even a reflector.
Great tips! I have a question about the bright harsh light. I found lately that when I use my 35mm 1.4 or 85mm 1.2 (both new to me as of last month) and I want to get nice bokeh- when I shoot wide open with my subject in the shade and the bright light behind them or coming in on a small part of them, like a shoulder (or a hoop earring- ugh!), I get terrible purple banding. Is this because of the aperture I’m using or should I just avoid bright light in the background?? Thanks!
Christy, that kind blooming you’re seeing there is what happens at the sharp transition between a very bright (and over-exposed) area, and a darker area in the image. Some lenses are just more prone to it than others.
It can be fixed to an extent in Photoshop, but ideally, it is best to avoid it when shooting. eg, avoiding a bright background where detail completely blows out.
As an aside, just be sure to know that shallow depth of field, is not the same thing as bokeh.
Thank you for this post…….so helpful. I live in Florida and of course, every bride wants to get married at the beach and the sun is often sooooo harsh. I totally appreciate all the information that you share. I learn so much from you, Neil.
Neil, you are brilliant! Tips like this are so valuable.
Thanks for another great and very useful post!
As people look great when shooting not full body, it is quite easy to find some shade without a distracting shadow on the ground (like it is visible in your pull back shot). All the people shoots I have done are easier and quicker to get stunning results then my main subject, pets.
Shooting pets for magazines, postcards and sometimes a calendar, I often have to deal with bright sunlight. Finding shade is possible, but I cannot lower the shutter speed too much and often it is difficult to blend shade with the brighter backgrounds. For now I use strobes a and reflectors a lot, but it will limit my flexibility and are useless for action shots. I’ll rent a large diffusion panel for test purposes. Possibly this will ease and enhance my set ups.
Kurt P from Belgium.
Neil, in the maternity shot of Amy I see you have a trigger connection on the flash stand with a wire to the flash head. Could you tell me what set up you have here as I’m looking to buy something to do the same. Very nice shot BTW.
Charles
Charles, what you’re seeing there is the cable of the Nikon SD-9 battery pack (B&H). It’s very useful in making sure the flash recycles fast enough on a shoot. The Canon equivalent is the Canon CP-E4 battery pack (B&H).
Wonderful examples again.
I’m guessing you didn’t need to gel the flash for shade, as it wasn’t deep shade. And that the softbox flash in the first photo was only providing fill?
Funny how the simpler the technique, the more questions you get.
@ Charles Mercer. There’s a full equipment list after the last photo of Amy.
Great post, thankyou. As always, a thoughtful and so-simple-its-clever solution!
great pics but why not use ISO 100 at f2.8 ? or did u specifically not want the background so soft
The change in depth-of-field between f2.8 and f4 is incremental. It isn’t as dramatic as people think. So the background isn’t that much softer at f2.8 compared to f4
Yet, I do want the extra sharpness that f4 would allow me, as well as that tiny bit more depth-of-field for the photos where I added Nick. It’s a balance thing.
Neil:
In the first example, could you not also use on-camera fill flash in TTL-BL mode?
I could’ve used on-camera fill-flash, but off-camera flash with a softbox is better, and allows me more flexibility in how I pose and position my subjects.
Hello Neli,
always wonderful!
Listen …… in the first house with 1/250 f4 and you used the softbox exposing for your subject.
Question ………..
1) expose for the subject (needle through the center of the exposure) and flash TTL with EV -2, -3?
2) expose for the subject (needle through the center of the exposure) and flash TTL-BL with EV -2, -3?
3) expose for the subject (needle through the center of the exposure) and sottoespongo my subject of one or two diaphragms and then add the flash (TTL or TTL-BL)?
4) when I expose for the subject use zoom To fill the frame with what measurement? MATRIX-SEMI-SPOT SPOT??
Thanks Neil I want your lot to these important answers!!
Edy Trigona
Genoa, Italy
PS: My aunt who lives in New Jersey know you …. and I’m happy!!
Edy .. that kind of analyses of a specific method would be useful in explaining an approach to a technique. But it isn’t what I did here.
So unfortunately, I can’t answer your questions with the exactness that you’d like. I was more intent on making the photographs work, and keeping the momentum of the shoot going. Rather that, than get stuck with a detailed mental method of doing this. Approaching all this in an academic way will just slow you down.
I used this for my first wedding shoot. Worked great! Thanks
Hi Neil,
I’ve read and kept your advice in mind for my mid day photo shoot, its a bright sunny summer day. I’ve tried the same set up as you, ie off-camera, softbox the same side as your, TTL flash (Canon 580), Canon lens 70-200mm f2.8
I’ve tried to set shutter speed to max 1/250, f4, ISO100 but the background was still bright so I have to dial the aperture up to 5.6 or a bit higher to get it a bit under exposure, but I don’t get a nice DOF as I wanted.
The sun was above and at the back of the object (apply your advice on facing away from the bright sun on other article), ie. her face was darker then the background.
What would you do in this situation? If I want to have f4 for a nice DOF then the only option I have is dial up the shutter speed and use the high Sync. Is it sound practical?
Thanks a lot
Regards,
Tan