Flash Photography Techniques
Using video lights ~ Flash photography tips ~ More articles about flash
![]()
Flash photography tips
The preceding pages, and the entire Tangents blog, contain a lot of information, whether techniques, ideas, equipment info, or random snippets. The posts cover a wide range of subject material, but mostly deal with flash photography, lighting, and general photography technique. But I’d like to bring the essential topics on flash photography together to one solid starting point.
This page then lists the most important advice that I can give you about flash photography. It should be a good jump page for anyone new to this website and new to flash photography.
My top 20 list of flash photography tips
1. Don’t fear your flash
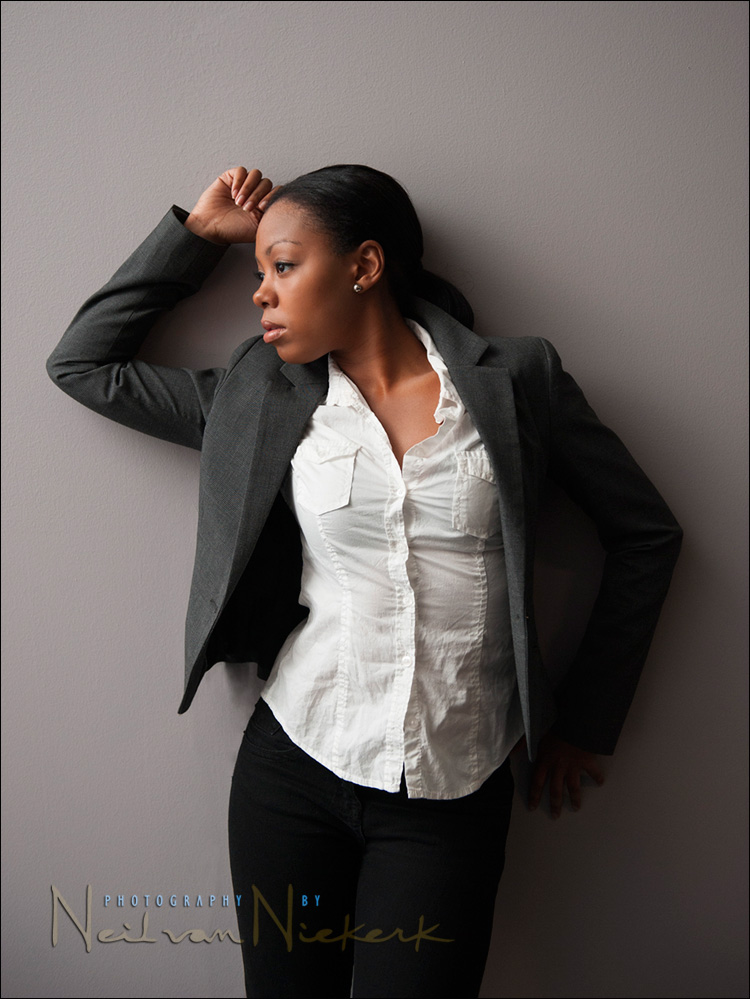
It is entirely possible to get amazing results from your flash. Look at the image above. It’s done with one on-camera speedlight .. bounced properly. It’s actually pretty easy once you get used to it. So hang in there.
2. You need something better than your camera’s built-in flash
You really do need a speedlight that attaches to your camera’s hot-shoe for best results. You simply can’t get there with just that pop-up flash on your camera. You need something bigger. Something that can rotate and swivel. The manufacturers that try and sell you little add-ons and gizmos and promise you that you will get great results from your pop-up flash after spending a couple of dollars on their crap .. well, they are misleading you. Get a proper speedlight!
3. Bigger is better
My advice will always be to get the most powerful speedlight you can afford. The more powerful your speedlight, and the more features it has, the more options you have.
4. Bounce your flash for better results
The larger your light-source, the softer the light. For that reason we bounce flash. We’re creating a larger light source. This implies that when we’re working indoors, and we have walls and a ceiling around us, that shooting with direct flash straight-on is possibly the worst that we can do. We may as well have stayed with the pop-up flash, and saved ourselves some money. So, bounce your flash!
5. Use that wall as your softbox!
Don’t be stuck in thinking you can only bounce your flash off the ceiling. Bounce your flash off the wall(s) behind you, and beside you. Even try bouncing your flash into the open room behind you.
6. Directional light looks more interesting
By bouncing flash off areas to your side, you can get directional light on your subject, instead of flat lighting. Here’s another example.
7. Flag your flash
When you bounce your flash to the side, make sure that there is no direct flash spilling on your subject. I use a piece of cheap black foam, held in place with hairbands, to make sure I only get soft indirect light on my subject.
8. Allow TTL flash to make your life easier
TTL flash technology can allow you to get great results easily, but you may have to adjust your Flash Exposure Compensation.
9. Nudge your TTL exposure with flash exposure compensation
TTL flash exposure could vary, and it can also give you under or over-exposure. That’s the penalty for getting good results easily .. your exposure may vary, unless you adjust your flash exposure compensation. With practice (and a sneak peek at your camera’s preview), you can pre-judge this to a good degree.
10. TTL flash and manual flash are two very different beasts
You have to understand the difference between TTL flash and manual flash, and how their behaviour differ. They each have their own benefits. There are those photographers who disdain TTL flash, and only push one way of using flash – manual flash. You’ll be a stronger photographer in knowing the differences between manual flash and TTL flash .. and being able to use either with confidence.
11. Understand maximum flash sync speed
It is imperative that you understand what maximum flash sync speed is .. and why it is often a sweet spot when you use flash.
12. High-speed flash sync
High Speed Flash Sync (HSS), also known as Auto FP on the Nikon cameras, allows us to go past the limit of maximum flash sync speed. A truly useful feature, but be aware that there is a penalty to be paid for going into the higher shutter speeds while using flash.
13. Aperture controls flash exposure? … well, maybe
You will often see this short-cut thrown around. It is true to an extent. But you need to be aware that aperture affects manual flash exposure, but not TTL flash exposure. Similarly, you need to be aware that ISO also affects manual flash exposure.
14. Shutter speed controls ambient exposure? .. well, maybe
This is another short-cut which can be misleading since other photographers may well omit in telling you the entire truth … that aperture and ISO also affects ambient light. Where that shortcut – shutter speed controls ambient light – actually kicks in, is for manual flash, where shutter speed becomes the only independent control for ambient exposure. A subtle but important distinction.
15. Gel your flash for tungsten / incandescent light!
If you’re using flash in an environment that is predominantly incandescent lighting / tungsten lighting .. and you want your flash to appear more neutral, and not so blue (or your background so grunge-orange), then gel your flash to join the incandescent spectrum .
16. Throw away the tupperware on your flash
When working indoors, you can most often get the best results by bouncing your flash. You don’t need that expensive piece of plastic that is advertised as being the solution to all your flash photography problems.
17. Allow available light in
Sometimes flash is your dominant light source. Sometimes flash is your only realistic choice. But it usually looks better if you allow available light in to give you some context and colour and mood.
18. Always start with the available light, and then add flash
At times it might need a slightly different approach between manual flash, and TTL flash .. but invariably, a good starting point when figuring out what you need to do with your flash, is to start with your ambient exposure.
19. Matching, and even over-powering the sun with flash
We can easily use a speedlight to match or overpower hard sunlight. But we need to consider our settings. And be aware that going to high-speed flash sync isn’t necessarily our best option here.
20. Flash may, or may not, freeze the action at slow shutter speeds
You will often hear that flash will freeze movement, and freeze camera shake when shooting in low light. The answer is … maybe. Perhaps. It depends. There are a number of factors which makes it difficult to give a definitive answer because it depends on the scenario.
 next section: Recommended books on photography
Help support this website
If you find these articles of value, please support this website by using these Amazon and B&H affiliate links to order your photo gear.
I also offer photography workshops and tutoring sessions. There are also video tutorials, which are online workshops on photography.
Join us on the Tangents Facebook group for further discussions.
Neil vN

Books by Neil van Niekerk

Really good tips Neils.
These really lift the veil between manual and ttl flash but also it’s “easier” and cheaper to bounce your on camera flash than having it off camera and require more “costly” wired or wireless equipments and assistant.
Happy holidays and thanks for the tips.
Thierry
Nomad Photography Australia
Great tips and a great, concise list of available articles with helpful summaries! :) love your site after semi-recently discovering it and this (along with the list of numbered articles on the sidebar) make your site one of the best places to really start getting into flash photography! I also am an avid Strobist reader and Digital Photography School reader, but neither of those seem quite as accessible to a newcomer as myself, so great job! :)
Neil,
I’m having trouble with my exposures after reading your book twice. Can you give me some quick advice. Almost everytime I use your method the room I’m in is still too dark. I don’t dare go below 1/60th shutter speed due to blur. My apature is 5.6 and the ISO is 1600. The meter tells me it will be underexposed and it is even after using TTL and using the black foamy thing and bouncing the light. It’s not too dark but I still need to add fill light in Picasa. I don’t like doing that. I am trying to avoid direct flash. SOme of your none flash examples have way less light than I have and your results are so much better. What am I doing wrong?
PS: Your method works fantastic when there is enough light in the room. Come back to Austin next year.
Eleazar
For all the importance of the first 19 tips, as a young photographer, its #20 that means the most to me. Thanks Neil!
Thank you for this post, Neil. All are important tips, but I emphatically endorse #3 and #8. I struggled before my own learning break-through. And, because so many photographers take a religious approach to lighting, it can be hard to find rational advice. At Strobist.com, manual is the way to go — [e|i]TTL is the ugly stepchild. At my very big local camera shop in Los Angeles, “speedlights” are looked upon as toys — not for “serious” studio photography. Hmmph.
I am the proud owner of a gaggle of 580 EX II’s. I shoot frequently and frequently shoot TTL. TTL gives me sync speeds up to 1/8000th (why try to overcome the sun when you can knock it down?) and my subject can move around the set without affecting my exposure. Plus, I still have the latitude to adjust main/fill/background ratios and do it from my camera.
The way I see it, I shoot with six on-board computers; one in my camera and one in each of 5 speedlights. They all work together for me and are directed by me. Sure you have learn it. But, when you do, its very satisfying! I’m not painting with brushes. I’m painting with computer-controlled ink jets. The canvas, though, is still all mine.
Sure, there’s a place and a time for manual and for 2400 Ws strobes. For me, 95%+ of the time, that place is in the closet. Its all about light and it’s ALL JUST LIGHT. Where your source? Where’s your subject? It ain’t religion.
Happy Shooting to All :)
Great Tips…Definitely an asset to keep it and practice…practice…practice.
Neil.. One question? There is a chance for me to buy one second hand Metz Mecablitz 76 MZ 5 Digital Hammerhead flash and dedicated SCA mod for 500$… is it worth it to buy it now?
I think this kind of flashgun is now discontinued and no more new items on stands to buy…why?
I don’t think I have ever seen you mention using such a flashgun.
Interesting things about these flashes are better swivel and more powerful than a dedicated on camera flash. But why it is away from Mr Neil’s bag?
Can you please explain?
Rafiyub, I do use Quantum’s flashguns, and I have a Profoto kit, and I will continue expanding the lighting gear I use. But for weddings, I mostly rely on speedlights. The reason is that they are a more controllable light-source than the larger flashguns.
Here’s an example I just posted in another thread:
I shot this at 100th @ f1.2 @ 1250 ISO
I bounced flash off the wall of the building next to them. I needed that wide an aperture to allow as much of the available light in as possible. I honestly don’t see any flashgun other than a dedicated speedlight (whether Nikon or Canon), giving me that kind of control.
A flashgun like the older Metz hammerhead flashes might be a good choice if you want brute power .. but I want finesse.
Thanks for the tips neil, I believe I have read most of your post here. I’m new to photogrpahy and my gear is only Nikon D40 kit lens; 55-200mm VR and Nissin Di866 flash gun. Any recommendation on what to purchase next. I’m plannig to shoot wedding, portrait and fashion. Thanks in advance. By the way is flash good enough?
Fred – Since you are interested in Fashion and Portraits, I would recommend a good quality fast prime lens for your next equipment purchase. A 85 f1.8 is a standard workhorse for portrait work (If you can afford the 85 f1.4 lens – get that one.) It will really help you isolate your subject from your backgrounds with the shallow depth of field. It’s how a lot of photographers create clean beautiful images.
I would also recommend buying a few photography books. (Neil has a list of some excellent books on his website besides his own.) Read as much as you can and make sure you understand the science behind your camera and how it works. If you want to be a wedding photographer, you need to be able to problem solve in high stress situations. The more you know and the more comfortable you are with your camera, the better you will do. Weddings have many different quickly changing lighting conditions and you have to know what settings you want and why.
As for your flash – for right now there is nothing wrong with it. It should serve you well. But as you progress and add new equipment you’ll want to look into getting the sb-900. It is worth the money.
Hope this helps,
Stephanie
Neil, another great post! Just read your book and loved it!
Question: I can’t seem to find anything about what you recommend for the zoom setting on your speedlight when bouncing during an event. I use it for creative purposes in portraiture but am never sure what to do with it for events/receptions. Do you leave it on auto zoom or set it to something or set it per shot?
Thanks!
Jesse .. I keep my flashhead zoomed out to the max these days. It gives me more control and more efficient use of my flash’s power.
Hello and thank you for all of this amazing information!
Quick one for you – you say to first expose for ambient light, what if the correct exposure for ambient is 1/30th shutter..that would cause camera shake. Proper exposure could mean different settings based on ISO and Aperture..say f3.5, ISO 1600, shutter 1/30. Do you recommend shooting as wide open as possible and exposing as best as you can assuming the shooter is holding the camera vs using a tripod?
Also, once you’ve exposed for the ambient light, simply turn on the external camera flash and adjust the flash exposure?
I’m just new to flash and will be shooting a night wedding soon…
Thanks!
Jennifer … as a general approach, you have it right.
Re the choice of shutter speeds, I would recommend using a higher shutter speed rather than a slow one. Too slow a shutter speed is usually the reason for soft images.
That said, I do take my shutter speeds lower for effect, or when necessary to get more ambient light in.
Hi Neil, these are very usefull tips. I’m still a newbie in flash photography, and your articles really helped a lot! Hope I could find your book here in Malaysia. Now to practice more flash photography! :)
Neil – this is the single most useful and well written information I have ever come across on the net… and I have read a lot of stuff!! Thank you for taking the enormous amount of time that it obviously took to put all this advice and help out there for other photographers to learn from – and free of charge. You are a legend!
Pat Reynolds (Australia)
that dang tupperware! i had one, thought it worked. but returned it because i was determined to learn to bounce!
I recently started using a flash and over the last 2 months have become a fan of your site. I have made the “black foamy thing” and also a snoot from the remaining sheet and they work great. You expressed your thoughts about on flash modifiers indoors (above) but where if ever do you see using diffusers like the Ultimate Lightbox products, Gary Fong’s line-up, or especially the Orbis ring light (is attached to flash and uses the flashes light, doesn’t have its’ own lights- http://www.orbisflash.com)? You do list umbrellas/stands and softboxes in your gear list but I would like to be more compact.
Steve … the crucial difference in how I bounce flash (whether with the black foamie thing, or just flagging my flash with my other hand), is that I am very aware of the DIRECTION of my light.
I want directional light.
I want my light to come from elsewhere than from my camera’s point of view.
This way I can enhance the form, shape and dimension of my subject.
This is in stark contrast to how pretty much every other flash modifier works that gets plonked on top of a flash, whether it is a Fong Dong, or a Flip-It, or Stofen or Ultimate Lightbox. These light modifiers throw the light forward from the camera’s point of view .. or even when it is bounced, it is still in line with the camera’s point of view.
With these light modifers, you simply can not get the kind of result as shown in the image at the top. Therefore, my interest in them are low.
What bothers me greatly with how those kind of light modifiers are promoted, is as a cure for flash photography problems. They presume to allow the photographer to NOT have to think about direction of light and the quality of light. Hence, they just don’t give the best results when working indoors with bounce-able surfaces around.
Now, specifically about ring-flash and the modifiers for speedlights to create a ring-flash. To my eye it is some of the ugliest light possible with a flash. I really dislike the look of ring-flash when used as intended.
Chuck Arlund has shown me photos where he used ring-flash as off-camera flash .. and then it works .. because it is off-camera. But ring-flash, when used in the usual way, is ugly light.
“Thankyou” so much for sharing this tips and tutorials wit valuable knowledge of photography, all us appreciate, professional, novice, semi-pro. All of us want to say thank so much again.
Hi Neil,
I was taking a class on manual flash photography and the photographer teaching the class uses non-TTL auto aperture “A” mode especially when lighting groups and the room has high ceilings. When he needs to increase the flash level he increase it by 1 stop or so, for example if the camera aperture is at F8 he changes the flash aperture to F11. He always leaves his ISO at 400 and shutter speed at basically 60. I have been practicing your techniques so what are your thoughts on using the “A” mode. Also he says he always shot people expecially groups at F8, which I disagree because I like to blur my background and sometimes there is no room to use telephoto lense…
Trina … that would definitely work.
In my description of flash, I usually just stay with TTL and manual, since the Auto flashes have two distinct ways of operating. I felt that including four different descriptions would just make it all too complicated.
The ‘old school’ way that Auto flashes worked, is that the flash would measure the amount of light emitted, and cut it off via a thyristor circuit. So the flash has complete control over the flash exposure. You’d set the flash to give you f5.6 (for example), and then you can over-expose by opening your lens up, or under-expose by closing down. Very simple way to get fill-flash. You set your flash to give you f4, while you set f8 .. and expose correctly for the ambient light.
Modern cameras that have speedlights that can be used in an Auto mode (like the Nikon speedlights), work slightly differently. The flash still controls the output, but the aperture setting is controlled by the camera. In other words, the flash now follows the aperture you set. In this sense your speedlight now reacts similarly to a TTL-controlled flash. So now you wouldn’t be able to under / over-expose like you’d be able to with the older style Auto flashes.
So if I had to distinguish between all of these modes, the pages here on flash photography would become more involved and convoluted. And hence I decided to keep to just TTL and manual flash in my explanations.
Your teacher’s method is sound. But in just keeping to f8 and f11, he foregoes the subtle addition of flash to low ambient light levels. The areas where we work when we’re at 800 ISO (or higher), and f2.8 (or wider) … those areas. The style he has with flash sounds like he wants flash to dominate to an extent, all the time.
It becomes a matter of style and choice then. : )
I forgot to mention that the flash was the SB800. But his concept is that when I use f2.8 with two or more subjects, There is a chance of one or more of the subjects being blurred, which is probably true, but I like my subjects to stand out from the background. He also pointed out that my D90 really can’t support high ISO’s without having grainy pictures. I guess it is a matter of style and I like having a balance of flash and ambient light. The reason I went to the class was to learn how to light groups using manual flash and calculate the distance in buildings with high ceilings.
The D90 has, according to the DPreview site, the same sensor as the D300. So it is quite good with high ISO settings. But depends entirely on the final use of the image of course.
f/2.8 is shallow DoF with a long lens, but I often photograph couples at f2.8 … but I do make sure their faces are on the same plane of focus. But it can work. Of course, greater DoF is better for straight-forward portraits.
And yup, it is a matter of style and personal choice.
Neil, I hope this hasn’t been asked too many times already but doesn’t the effect of the flash disappear when you aim it into the open room behind you?
William .. it is one of those things you will have to try.
Just do it and see if it works. Let me know. : )
Neil, with the assistance of your website and experience, I have been learning more about the way the camera and flash work. Thanks!
TTL flash exposure is calculated with a pre-flash signal that the flashgun emits before the main burst of light. The main burst of light is what gives you (hopefully) correct exposure. But the camera needs some way of determining what the correct flash exposure should be. In order to do that, the camera measures the amount of light returned from that pre-flash. Note that the shutter and the sensor of the camera have no involvement in this part of the equation- the shutter is closed. The light bouncing back from the scene enters the lens of the camera (through the lens). The light is then read by the light meter within the camera. Remember, the light meter and the sensor are not the same.
The first flash is the preflash that goes off before the shutter opens. The second flash is for the proper flash exposure, while the shutter is open. The light reflects back from the scene and “burns” an image onto the sensor.
If you are using camera manual mode, you are responsible for choosing the camera settings for the exposure of the photographs. When you are using aperture priority mode, when you half press the shutter button, the camera tries to calculate the settings for exposure, based on where you are pointing the lens. When you half press the shutter, the exposure settings are locked, if you have exposure lock & focus lock enabled in your camera’s menu, then you can recompose your photo, and fully press the shutter button.
A question might be “when using the flash on my camera, when is the exposure calculated for my flash? Is it when I half press the shutter button, or when I fully press the button? The flash exposure calculation begins when I fully press the shutter button. Because the preflash is instantaneous, this process is really instantaneous. The direction that your flash is pointing when you fully press the button dictates the scene which will reflect back the prefash.
The preflash is almost imperceptible as a distinctly separate flash of light because it occurs so closely in time to the real full flash of light that it uses for the flash exposure. They seem to occur as just one flash. But really the preflash sends out this flash of light which hits the subject and scene, and bounces back through the lens of the camera, thereby giving the camera information about the distance and reflectivity. Now the flash/camera sends out a second flash burst to light the scene for what it calculates is a correct flash exposure. Often the calculated exposure is not what you had in mind, so just dial in flash exposure compensation (FEC). Just like when you are not using the flash, backlit scenes often fool the camera.
Flash exposure is achieved when the flash utilizes duration of its output. A longer duration (or a longer flash of light) will give a brighter flash exposure.
We can use aperture and ISO and shutter speed – all three controls – to control ambient light exposure, without having an influence on our flash exposure (because in TTL flash mode, your camera will automatically calculate proper flash exposure, in each photograph, then raise or lower the output from your flash to achieve this). When you change the iso or aperture on your camera, the range of the flash is affected, but, in ttl, that does not make a difference to exposure unless the subject is out of range of the flash. The iso & aperture & shutter speed (below max.sync speed) does not make a difference to the flash exposure in ttl flash mode, because the camera and flash will adjust the output of the flash so that the flash exposure will be the same for the subject. Note, the flash exposure will be the same, the flash output will be different every time you change your iso or aperture. This is really the brilliance of ttl flash mode. As stated, the iso & aperture only affect the workable range of the flash, when using ttl flash. Raising or lowering the iso & aperture will not make the flash exposure brighter or dimmer. With manual flash, however, the opposite is true.
In aperture camera mode, if I lower my iso, the ambient light will be less, so the shutter speed lowers in order to raise the ambient light level back to normal. For my flash, when I lower my iso, the flash range will lower.
The preflash does not seem to occur as 1 flash when you set your flash mode to rear sync flash, or 2nd curtain, and set the camera to manual mode with a (eg)5 second shutter speed. But If you are set to front sync, or 1’st curtain flash mode, then it will occur as 1 flash even if you are at 5 second speed. The first flash is the preflash that goes off before the shutter or curtain opens. The second flash is for the proper flash exposure while the shutter is open.
In manual camera mode, if you lower your iso or aperture, the ttl flash will increase it’s duration to achieve proper flash exposure. The ambient light exposure may for example get darker, but your flash exposure, in ttl flash mode, should remain properly exposed. It’s a good experiment. One late evening at the beach, set the camera to manual mode…start with 1/2 stop underexposed ambient light according to your on-camera meter, and turn your flash to ttl. Take a photo of your friend/ volunteer. Then vary your ambient exposure down by 1/2 stops or 1 full stop for each photo, according to the camera’s meter. If theory is correct, the background light level should change, but the flash exposure should be the same on your friend (as long as your friend is not too far away from the flash, and out of range. As you vary your iso or aperture for the ambient light, it also affects the range of the flash).
This is also a good opportunity to play with shutter speed and see how it affects ambient light at night time. Notice As you lower your speed, and when you are using your flash, there won’t be a dark black background…sometimes the speed has to be fairly slow, like 20 seconds, or 10 seconds. It all depends on your level of light, and the iso and aperture you are using. This experiment is best with a tripod.
Shutter speed never affects the flash exposure, unless you are using a shutter speed that is high sync speed, then the efficiency of the flash is greatly reduced.
Shutter speed always affects the ambient exposure.
Have a good week!
I recently attended my first workshop on flash photography (1 day); I will be taking pictures for my daughters Dec wedding. The setting is a glass chapel in the woods at 1:30 pm. I use a Canon Rebel t2i digital camera w/canon speedlite 430ex flash. Since I am a newcomer to external flash use do you have any special tips for me? I know this question seems broad but any advice you could give me would be appreciated. Thanks
Sheri .. this is the best I can do for you .. wedding photography tips & advice.
Neil: excellent list! I just found your site (a big thanks to Wayne Fulton for pointing readers of his page “Basics of Flash Photography” to it!) I’m looking forward to reading more of your site’s pages and learning a lot from them. Thank you again for sharing your experience and knowledge!
Using a D3100 with a sb-700 speedlight. I mainly use aperture priority mode and the 700 in TTL. When I look at my shot with highlights on and I have blown some, do I need to change exposure or flash compensation? I am a beginner.
Also, when to use the diffusion dome?
Neil,
Laat ‘n boerseun nou so ‘n lekker en leersame ‘site’ het!
(For a boy from South Africa to have such a informative website!)
Your website is truly a wonderful resource. Well written, excellent layout, wonderful source of information and inspiration.
Last week I gave a talk on Off Camera Flash for a group at a club, and provided your website as a reference.
Keep it up – and may your business go from strength to strength.
Best
Leo Theron
Hi
Implied in all i have been reading is that direct flash is the worst light source.
I photograph weddings (mostly people with dark skin). I have all sorts of radio controlled strobes and soft boxes which give good results when I use them.I have also
found that direct flash can very good results .I have a vivitar 285(autothyristor) on a bracket and a 430 exII or a 580II ex set to the ettl mode on camera.I have to vary power levels during testing to find the best settings for a given environment and skin.I shoot raw expose a little bit to the right I have to spend some time in ps but the results are far better than when I use bounce alone and worse than when I use the silver umbrellas
KamtaPersad
My question is what if you have nothing to bounce your flash off of? I have done well when I have something to bounce it off of, but when there is nothing there, what can I do to get better shots? Without that terrible back shadow by shooting straight on.
I would say you can use some sort of bounce card and/or diffuser attached to your flash head.
Jessica, in that case you have to either compromise, or adapt your approach.
from the article
13. “But you need to be aware that aperture affects manual flash exposure, but not TTL flash exposure. Similarly, you need to be aware that ISO also affects manual flash exposure.”
This is bit misleading to say. Of course that ISO and aperture (F number) affect TTL flash too, in the same way as use of manual flash. Altering these two values will cause need for stronger or weaker flash of light for the correct or balanced exposure. So you need to be aware of this when using TTL too because you may want to intentionally opt for higher iso or greater aperture (lower F number) just to make flash weaker, thus less blindening in darker environments and similarly where distraction by strong flashlight is undesirable. Think night club photography and similarly. I know you trying to say that it should not worry you much because regardless what iso and aperture you select, you will get correct level of exposure granted that the flash is strong enough; and there are some neat smaller flashes nowadays like Meike MK320 or Godox TT350 which may greatly benefit from intentionally raising ISO or opening up aperture, given the great high iso performance of modern sensors today. So one should be aware of relation of ISO and aperture to the flash output in any mode be it TTL or Manual…
Hi there Vit
The way I state is very specific:
“aperture affects manual flash exposure, but not TTL flash exposure.”
Note that I very specifically mention the exposure. I didn’t say “doesn’t affect the flash”, because that would be ambiguous. I specifically state it in terms of the actual exposure.
When aperture does not control flash exposure.
And it is exactly as how you restated it yourself:
“because regardless what iso and aperture you select, you will get correct level of exposure “