Black foamie thing / Black foamy thing

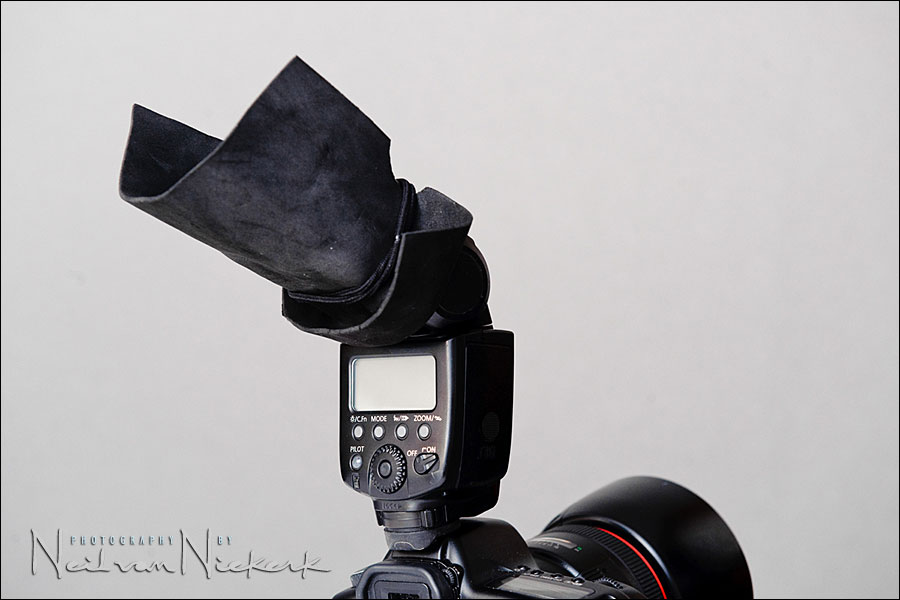
I use the black foamie thing (BFT) as a truly inexpensive flash modifier to flag my on-camera flash to give me lighting indoors that truly look nothing like on-camera flash.The 2mm thick piece of foam (Amazon), can be ordered via this link. I cut the sheet into smaller pieces.
The BFT is held in position by two hair bands (Amazon), and the BFT is usually placed on the under-side of the flash-head.
The linked articles will give clearer instruction, especially the video clip on using the black foamie thing.
The BFT is held in position by two hair bands (Amazon), and the BFT is usually placed on the under-side of the flash-head.
The linked articles will give clearer instruction, especially the video clip on using the black foamie thing.
Also be sure to read the article on how to bounce on-camera flash.


The results with the Black Foamie Thing and proper bounce flash technique, can easily give you portraits like this with flattering light, where there is no hard flash shadow.
Articles about the black foamie thing:
- throw away the tupperware!
- an example of bounce flash technique (cute baby)
- the black foamie thing
- how to bounce flash
- video clip – using the black foamie thing
- bounce flash portrait – a consistent technique (model: Shawna)
- bounce flash technique – mimicking soft window light ( bride: Jennifer)
- bounce flash & short lighting (model: Noreen)
- bounce flash vs. available light vs. videographer’s light
- bounce flash & catchlights
- why I use a light modifier that is black (bride: Heather)
- bridal portrait with bounce flash (bride: Stacey)
- directional light from your on-camera flash (bride: Laura)
- bounce flash photography & white balance settings (model: Roz)
- using the black foamie thing to bounce flash forward (wedding: Tatiana)
- bounce flash with and without the black foamie thing (model: AD)
- wedding photography – tips for detail shots of the wedding rings
- bounce flash for bridal portraits (bride: Christine)
- using on-camera bounce flash outdoors at night (wedding: Jen & Chris)
- bounce flash photography tip – bouncing flash towards a window (model: Anelisa)
- bounce flash with and without the black foamie thing
- how do you meter for TTL flash & ambient light (ring-bearer)
- photographing the wedding processional with extreme bounce flash (Allison & Scott)
- directional light from off-camera bounce flash (Ulorin Vex, Monaco foyer)
- gelling your flash for effect (model: Bethany)
- my favorite lighting setup to photograph kids indoors – bounce flash!
- wedding photography – detail shots, bounce flash & macro lenses
- flagging your flash to control back-lighting (model: Aleona)
- bounce flash: adjusting the black foamie thing as a snoot (Peiwen & Eric)
- various scenarios: balancing flash with ambient light (model: Catherine)
- bounce flash vs. available light vs. videographer’s light
- wedding photography: bounce flash indoors … in the limo
- bounce flash & direction of light (model: Carly Erin)
- review: Best light modifiers for on-camera flash
Help support this website
If you find these articles of value, please support this website by using these Amazon and B&H affiliate links to order your photo gear.
I also offer photography workshops and tutoring sessions. There are also video tutorials, which are online workshops on photography.
Join us on the Tangents Facebook group for further discussions.
Neil vN

Books by Neil van Niekerk

Just wanted to let you know I got one of these. I used it and loved it! So glad I found your site and the instructions on how to use the black foamie thing! :)
wouldnt placing a small grid-spot on ur speedlight accomplish the same thing?
Naftoli .. try it out and compare and see.
Neil vN
Oh….but we want the Neil van Niekerk deluxe, autographed BFT, designed to exacting specifications with gold engraving and specialized band holding the BFT in place….and we want to pay $99.99 for it…..LOL!
Anthony, if there was a demand for it at $99.99 … then I’d definitely do it!
Neil vN
I like the idea of flagging the flash to create a softer light source. I recently bought by SB700 and i am gonna use a piece of the black side of the box as my BFT. I shall call it BCT, my “black cardboard thing”. That way excess light shouldnt be spilling over
Hi Neil,
I find your work just amazing, but above all, your honest and open sharing of your tremendously helpful knowledge and experience. Thank you.
Would you have any objections if I wanted to improve on the BFT design and sell it for profit on my website? Also, I would like to provide a link to your site from my website so that people can learn and benefit directly from the Master on the use of the BFT.
Please let me know.
Thanks again.
Ali
Hey Neil,
First, thanks for the outstanding advice and willingness to share your talents. On the BFG size… I understand its use is to stop the flash from going forward onto the subject, so, why would the length matter? I know its longer for when the flash is angled far over but does it have to go back short length on higher angles? Seems like I can just set it long and leave it. Does it matter?
If the BFT is larger than is necessary (ie, larger than juuuuust enough to stop the light from directly hitting your subject), then the BFT just eats up too much light. There is definite loss of light.
Neil vN
I just love that it has it’s own acronym! Reminds me of a “BLT” sandwich, except a “BFT” is slightly more functional. That aside, I’m glad I stumbled across your site via Flickr and hope to read through more techniques and advice on flash photography.
Hi Neil,
I use the BFT as often as I can. But I have one simple question. Is there a simple way to put that darn thing on the flash ? I always have some difficulties trying to put the elasting band around the flash and the BFT! :-)
Hi Neil, love your photography and this site, is tremendous help. Two questions about your black foamie thing technique.
1. How high is “too high” for a ceiling being useless to bounce flash with your SB 900?
2. Do you adjust the position of the head for every shot?
Keeping to the idea that we want to approach this like studio photography in how we place that “big softbox”, the bounced flash, then 30-45 degrees up and to the side would be best. Higher than that, then you rush getting shaded eyes.
It needs some experimenting.
“Too high” would also imply that you might not get enough light from your bounced flash, but this ties in directly to the size of the place (i.e., the distance you’re bouncing your flash), and your choice of aperture and ISO. Also, the color of the walls and ceiling will have an effect.
Again, you need to experiment.
And yes, you have to continually adjust the position of the head for however your subject is positioned. It can’t be static. Static doesn’t make sense, because then there is no consideration of the direction of light.
Neil vN
Dear Neil, Thanks a million for sharing all your valuable knowledge will us all. This is really great. All your tips are incredibly helpfull. I am most certainly going to look for a BFT here in Cape Town. Many thanks. Eddy
My husband gave me your book Direction and Quality of Light and from it I discovered YOU! Thank you so incredibly much for sharing your years of Photography experience and knowledge. I am excited to try the BFT! I think you need a book entitled: “Brilliant.”
Sincerely,
Gina Zhidov
First, thanks for being one of the givers in life. Very much appreciate you taking the enormous amount of time to teach what you have learned… and so effectively. A big thumbs up.
Second, does the front overhang of the installed BFT vary much from one situation to another? And if so, what is the max and the min in typical use? By front overhang, I mean the dimension from flash “lens” forward to leading edge of BFT.
It’s just enough of a lip to
– block the light from hitting your subject
– guide the light to where you want to hit the wall or whatever you are bouncing off
– not hit the person behind you with a full blast of flash
Given the criteria, what are the typical dimensions?
video clip to show how the BFT is used.
Neil,
I made a “Black Foamie Thing” last week and pressed it into service at a relative’s wedding on Saturday https://jeffreykeyser.com/weddings/stephanie_and_david – I was a guest and did my best to stay out of the official photographers’ way, hence the minimal number of images.
Given my $0.99 investment and two hairbands (compliments my daughter), I am very pleased with the results, but feedback and suggestions are always welcome.
Thanks,
Jeff
Harry,
You mentioned a 580, I’m assuming you mean a Sony 580 ? I’m also a Sony Shooter, as well as Nikon, but find myself migrating back to Sony. Have an A77, A99, and Nikon D7000. Looking to sell my a77 and pic up a good used A850. Just want to let you know there are other Sony shooters out here, just just CaNikon.
Telmo from Portugal emailed me to let me know that the “black foam” is ethylene vinyl acetate, and is sometimes called EVA foam.
Bounce flash with BFT is definitely to way to go get that studio look from a single on camera flash.
Hey Neil. I noticed when you showed the example without the BFT, it looked like same effect you would get bouncing with a diffuser cup. Which reminded me why I stopped using those diffusers. With the exception of a 40-50 ft. ceiling.
Hello Neil, I never used BFT but I always used light modifier slapped under the flash with great results until someone ask me if I used BFT and I did not had a clue what he is talking about. Then he said, just google it and this is how I found about it. I can say that it does very good job for what is intended for.
Impressive idea!
I just wondered why you didn’t used a white one to give the light a bit of boost toward ceiling and especially if the ceiling is very high (like in churches).
What do you think about use of other colors?
Why I use a light modifier that is black.
Go through the other linked articles as well.
I got through the article and all links there and I understand why you used black. My light modifier has on one side white and on the other side black and I am turning the sides depending on the needs. From the experience, when I was standing really far away from the walls and was not able to get closer I used white side to get extra boost or more light, Same thing when the ceiling was high, and it give me the excellent results, but I must admit that mostly I used black side and just on special occasions the white, unless I used external manual flashes.
The foam is more bendable and since it gives me the same results as my modifier I guess that I will make my own version of it. One side black and the other grey or white… Might experiment with other colors as well, like gold or silver, just to see the effects, like gold to give the pictures very light warm tone or silver for more cool contrast.
Thank you for all the good content. I tried the BFT yesterday and I don’t understand why I’m observing nearly one and a half stop down in my exposure, while working in TTL. This doesn’t make sense to me at all … Is it the same for you ? Do I have to compensate flash power up when I use the BFT ? Thank you in advance.
I suspect what is happening here is that you are already at the extreme end of what your flash is capable of delivering when you bounce flash, and then with the BFT added, there is further light loss.
Make sure you do the following:
– zoom to a longer length with the flash head,
– don’t have a massive piece of black foam that eats up all your light.
– the BFT is meant to be just enough of a lip to block direct flash from hitting your subject – it’s not a huge piece of foam. I roll mine back a bit, most often.
– make sure you hare within working range of what your flash is capable of doing, for your chosen aperture and ISO.
I hope this helps.
Neil,
Interestingly, I see Michael Zelbel from GoodLight magazine also using a BFT in his latest YouTube video, where he uses it to do a portrait in a bar.
I saw that! Makes me happy that others see the usefulness of such a simple device too.
Hey Neil,
Just wanted to say using the BFT for the first time was amazing and produced amazing results on photos that were shot in a portrait position. However since, Im an event photographer and have to shoot in landscape as well I was able to produce the same quality of light. How would you suggest getting to same/similar results for a photo in a landscape position?
Regards,
Sahil
Neil I only wish I found your BFT idea earlier before wasting money on all that crap. I was truly amazed by the performance that inexpensive mod can magically render into a photograph. As I have very busy walls, I used large foam boards to bounce the light. Is that ok?
Hi Neil, excellent video. One question : do you use a fixed flash spread angle, or do you vary it according to the proximity with the wall (ex : close to the wall — use 28mm spread ; a little further from the wall — use 50mm spread) ? Basically you want a broad, diffused light… Also, do you diffuse the flash or do you use it bare ? Thanks — Ed Barbosa
Ed … I keep the beam of light fairly tight by zooming the flash head. The main reason for this is that if the beam is wide, too much of the light gets eaten up by the black foam. So it has to be a telephoto setting on the flash-head.
Neil, with the Canon 600EX-RT there are 2 “color filter sensors” located underneath the flash head. Is there any issue covering these with the BFT? The normal way you show the BFT on the flash would cover these. As always, thanks!
Tim, I don’t think it affects the camera’s choice of WB. That said, I always select the WB myself – I don’t rely on the Auto WB when shooting bounce flash with a gel already on the flash. That is where those sensors come into play – when you use Auto WB, so that the camera knows which gel you have on the flash.
Hi Neil,
Pardon my ignorance but would the BFT be better if it was white.
It wouldn’t absorbe light, it would reflect more light to the wall or ceiling and it should still act as a flag to stop direct light hitting the subject.
Would appreciate your views
Michael – this article will explain why I use a light modifier that is black. It is all about the control of the light from my flash.
Does the flashgun have to be at an angle with the black foam thing fitted?
Darron – yes / no / maybe. The essential idea behind bounce flash is to control the direction of the light. Ideally, you want to bounce your flash into the direction that you want the light to come from. That will determine the angle.
Why black foam? Why not white? What about a foam that was white on one side, black on the other?
Hi there Sherwood – this article will explain why I use a light modifier that is black. It is all about the control of the light from my flash.
Hey Neil,
I was searching on different light gear and come across your videos and post. I really enjoyed it and it gave me a lot of information. Thank you for being so open and in sharing your experience with us. I really appreciate it.
Since I have to make a purchase so let me know if you have any affiliate link of B&H , amazon s I can use them and buy and help your website as well.
Thanks
HI there!
At the end of every article, there is a section that says “Help support this website”. Those are affiliate links. Thanks!
I use thin foam beer koozies. They are easy to cut into whatever shape I need. The fit just right on my speedlight.