Flash Photography Techniques
Dragging the shutter ~ Bouncing your flash ~ On-camera flash outdoors
![]()
How to bounce your flash
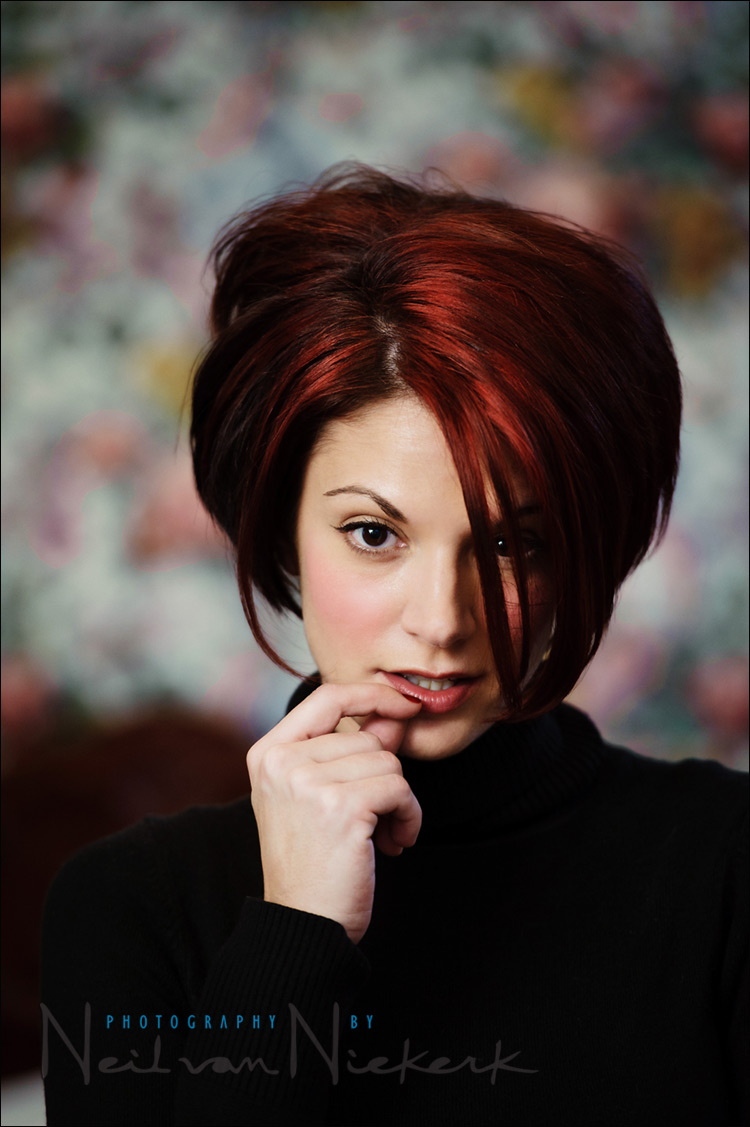
The camera settings for this image: 1/160 @ f3.2 @ 800 ISO – using TTL flash; FEC at 0 EV. Those specific numerical values are less important to achieving that quality of light, than the thought-process about how to use the light. Ultimately, this really is about the Direction & Quality of Light.
A single flashgun, used directly, gives hard shadows because it is a small light source. The only way to soften the light, is to make the source of light larger. The most effective way of doing this with on-camera flash, is to bounce it. Not only do we have softer light then (because of it being a larger light source), but we also have the opportunity to make the light directional.
With this image, I bounced my flash to my left, and upwards. I wanted the light to come from an imaginary softbox near me. My approach to bounce flash photography indoors, is to consider it as if I am shooting in a studio with a single large softbox that I can position. For this reason, I try not to use the ceiling directly between myself and my subject to bounce my flash. That will usually create top-heavy light and shadows under their eyes … along with being flat light coming from the camera’s position.
If you bounce the flash off a wall to the side of you, or behind you, then the source of light relative to the subject, is much larger than if you had shot with the flash straight on. There is a world of difference.
For off-camera flash, we have a variety of choices how we can control our light source’s direction and quality of light. For on-camera flash, when working indoors with bounce-able surfaces around you, using bounce flash is a fast and effective way of dramatically improving the quality of light from our flash.
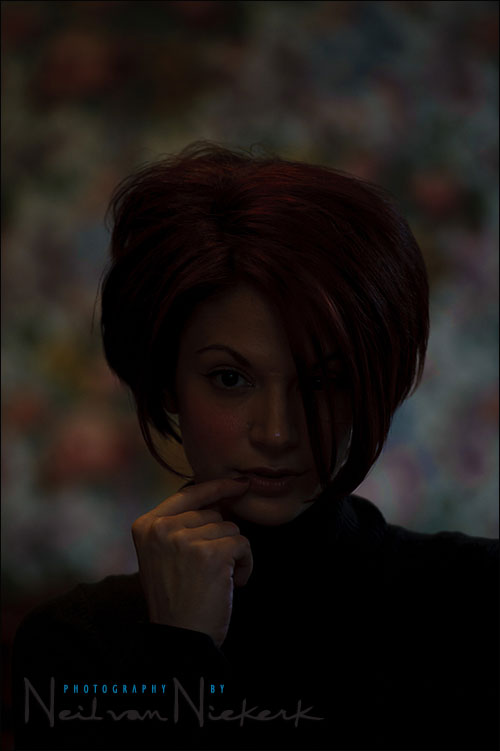
Just for comparison, here is the image without flash, so that it is clearly obvious how much flash was used in the top image. With the ambient light so low in the final image because of my choice of settings, what you see in the top image is nearly all light from the flash.
So where do I want my light to come from? Where would I have placed the softbox if I had been in a studio? This way of thinking usually gets me great results as in this photo above – the kind of light that it is difficult to tell whether off-camera flash was used, or effective bounce flash.
By bouncing off other surfaces like the walls or ceiling, you will also soften the light – if you’re using the correct angle. And here I want to stress something again – shooting with an omnibounce at 60 or 45 degrees, should not be a default way of using flash. For the best result, some thought needs to be put into how you use flash, and how you direct the light from your flash. Keep in mind that the intended result is to have no hard flash shadow. No tell-tale sign that on-camera flash was used.

On-Camera Flash Photography – revised edition
This book is explains a cohesive and thorough approach to getting the best from your on-camera speedlight.
Particular care was taken to present it all with a logical flow that will help any photographer attain a better understanding of flash photography.
You can either purchase a copy via Amazon USA and Amazon UK, or can be ordered through Barnes & Nobles and other bookstores. The book is also available on the Apple iBook Store, as well as Amazon Kindle. Also check out the Amazon Kindle store.
Learn more about how the cover image was shot.
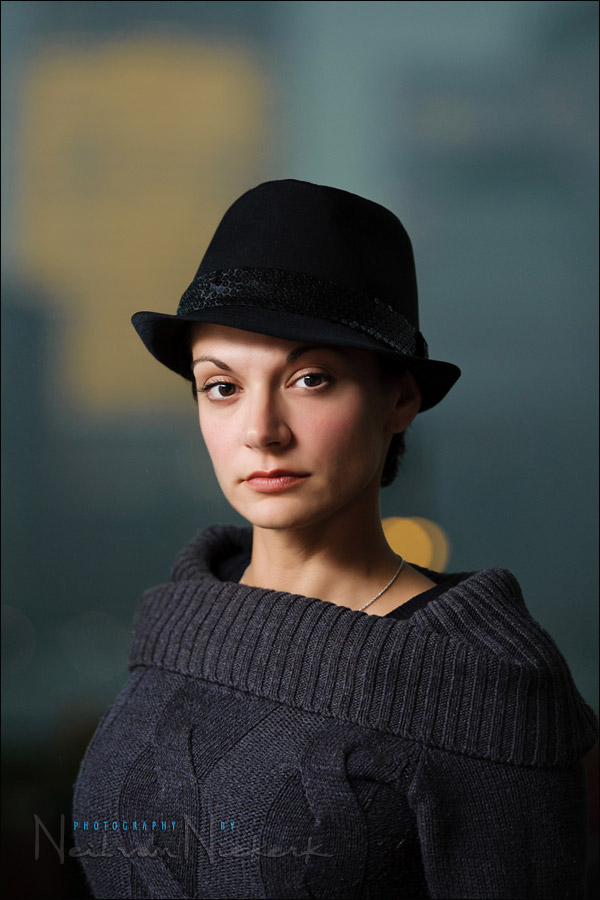
Let’s look at an example where the light from the bounce flash is even more controlled:
Camera settings: 1/100 @ f3.2 @ 800 ISO .. using TTL flash; FEC at -1.3 EV
Looking closely at this photograph, you can see the interplay between light and shade on her face. Instead of flat lighting as we would get if we bounced directly behind us, the light came from somewhere behind and above us, from our left. The approach here was the same as in the first image – where would I have placed my softbox had I been in the studio. The quality of light here is as good as you would get from off-camera lighting. Yet, it is on-camera bounce flash. The difference comes in how the flash was bounced.
A key factor in both these images, was that there was NO light directly from my flash on my subject. All the light was indirect. If I bounce my flash by tilting and swiveling it, I get to bounce the light at an angle – away from the subject. Then the light that comes back, appears more directional. There are areas of shadow and light. Bounce flash need not look flat. By keeping the basic physics in mind of angles of incidence and reflectance, it is usually easy to figure out where to bounce from to enhance the available light, or how to make the bounce light soft but directional.
You can control the light from your on-camera flash, by flagging the light with a piece of black foam.
With this second image, the available light makes a difference in that it gives a nice background with some out of focus highlights. My camera settings were dictated by the available light. I wanted enough of the light to register in the background. Since I was shooting with TTL flash, I had control over the ambient light by my choice of shutter speed, aperture and ISO.
Materials for the flash modifier used – the black foamie thing

The BFT is held in position by two hair bands (Amazon), and the BFT is usually placed on the under-side of the flash-head.
The linked articles will give clearer instruction, especially the video clip on using the black foamie thing.
Related articles
- Tutorial: Bounce flash photography
- Combining flash and available light
- Directional bounce flash
- Bounce flash and catchlights
- Throw away the tupperware on your flash
- Using bounce flash to mimic window light
TTL flash or manual flash?
I mostly shoot with TTL flash when I shoot with on-camera flash.
Off-camera flash is usually easier to deal with as manual flash.
Since I frequently shoot with TTL, I don’t often use the full power that the strobe is capable of, unless I’m using the flash at the extreme end of what it can push out. If your flash is your main source of light, it is important that you stay within the range of the flash’s output capabilities, with an appropriate iso and aperture selection.
Bouncing your flash reduces your flash’s output considerably – but your flash should compensate for this loss automatically if you shoot in TTL or Auto mode on the flash. That is, if you stay within the flashgun’s power range. If somehow the technology doesn’t quite match the theory here, just know that this is how your specific camera and speedlight responds … and dial in a new flash exposure compensation default when you bounce.
 next section: On-camera flash outdoors
Help support this website
If you find these articles of value, please support this website by using these Amazon and B&H affiliate links to order your photo gear.
I also offer photography workshops and tutoring sessions. There are also video tutorials, which are online workshops on photography.
Join us on the Tangents Facebook group for further discussions.
Neil vN

Books by Neil van Niekerk
Hi Neil,
Your various tutorials are really interesting and the quality of your work is outstanding. I am interested to know how you calculate flash compensation, is there a way I can work out how far my flash will travel when i bounce it off a surface or is it just practise?
Looking forward to your response.
Helen
Helen, that’s a topic all on its own – pre-judging the required flash exposure compensation.
There is no specific forumala or short-cut. With experience you will become better at judging how much FEC you need to set for a photograph that you want to take. By looking at whether the scene / subject is predominantly lighter or darker toned, you will have a good idea whether to nudge the FEC up or down, and by how much.
And then by looking at the LCD preview, you can fine-tune it a little but more. (Or a lot more.)
Neil, are you a fan of back lighting? I see a lot of people doing this and I am a proponent of this technique on occasion. The reason I ask is because I don’t see many images with backlighting. Is is because you are trying to stay away from “obvious” use of flash and prefer to be more subtle?
Max .. I do have some images with flash providing the back-lighting, as with this example.
Sometimes during outdoors evening shots, I’ll bounce the on-camera strobe into an umbrella that is hand-held by my assistant. He then moves in tandem with me, as I move up and down, or forwards and back. Yup, I hate direct flash that much.
Specific settings: Nikon D100; Nikon 17-35mm f2.8
1/6th @ f4.5 @ 400 iso / manual; matrix metering / TTL flash: 0 exp comp
There’s another flash going off to the left and behind the couple that I triggered with a radio transmitter attached to my camera. So this isn’t entirely on-camera flash – the image was helped by the strobe kicking in some back-lighting. This was with a camera (Nikon D100) that doesn’t have wireless TTL – but even so, wireless TTL would’ve failed here, since it relies on line-of-sight.
That rim-lighting helps in separating the subjects from the darker background.
I have been using flash indoors at a trade event I kept the shutter speed at 125 so that I could hand hold the camera. I set the iso at 800-1000 to allow for movement of subjects. The problem I have is depth of field. I have a very shallow depth of field and only some parts of one person are sharp. How can I increase the depth of field? Is it just a case of take a tripod and slow the shutter or just set up f8 or f9.5?
Chris .. those are your options. You would either have to add a lot more light via a larger flashgun (or more flashguns) .. and this isn’t necessarily practical. Or else you’d have to use a tripod to stabilize your camera for a slower shutter speed / smaller aperture.
Hi Neil,
In bouncing the flash in TTL mode, the flash will automatically compensate its output. So, why do you use a + EC in your first and last photos?
I admire your work and I am thrilled that I have found out about your tutoring site. Thanks.
Genevieve
Genevieve .. I just posted an article on the decision process about how much flash exposure compensation to add. It also goes over the ‘why’.
Hi Neil,
I love your site and have found it so helpful in laying things out in layman’s terms. Thank you, thank you, thank you!
I was wondering what you do when you don’t have the option of bouncing flash – say the building is all glass and you need to shoot inside or you’re outside and just want to use your speedlite on camera and not bring in off camera lighting. Would you use something like the flip it https://www.dembflashproducts.com) and stay in TTL? Or would you just point the flash toward the subject in TTL? What do you think produces the best results? Many thanks for your help!
Margaret .. when I encounter one of those ‘impossible situations’ for bounce flash, then I use other means. Ideally, off-camera lighting or additional lighting .. but sometimes that’s not possible. Then I might use a wireless TTL transmitter on my camera, and use my speedlight in my hand, held aloft, with a diffuser on my speedlight. As a very very last desperate resort, maybe direct flash .. but those would have to be desperate measures to use direct flash on-camera like that while indoors.
Neil, I came up with a solution for those times when I will have to shoot direct flash, especially when I have to move about and have no time for setup. I purchased a soft box attachment that measures 8.5 inches across, and I then mount the flash on a bracket that holds it above and to the left of the camera about 15 inches from the lens, and wired via a shoe cord. I had to change the bracket so it holds the flash to the left instead of directly over the lens as it was designed to do. In combination with the soft box, I tape some warming gel over the flash head, and pull the diffuser on the flash unit down. You still get harder shadows than is ideal, but alot better compared to direct flash. The closer to the subject you are, the better this setup works.
Jeff P
Hi Neil, I was wondering how ETTL works when using bounce flash. Since there is no actual measurable camera flash to subject distance, how does (or does it not?) ETTL know what the correct flash exposure is?
Alvin, ETTL flash does a pre-flash and measures the exposure based on that. Distance does not get calculated.
It’s like George says there. TTL metering with digital depends on a preflash. Before the main burst of light, the flash emits a preflash sequence, and the camera then meters this. Based on how much light is reflected, it will adjust the actual exposure.
You can see the preflash here in this timing diagram:
.. and it can also have a side-effect when using rear-curtain flash sync.
Hi Neil,
When you use your bouncing flash technique with canon 580EX II, have you usually use flash head at 105mm zoom setting (manual zoom) or flash head bounce position 50mm zoom setting (auto zoom when rotating the flash head to bounce position)?
Thanks Neil
Dendy .. I do zoom my flashhead out to maximum when I bounce flash. It gives a little more efficiency, which is becomes important in the way that I bounce my flash .. which is usually ‘away’ from my subject, instead of towards my subject.
Thanks Neil, I have one more question for you.
For you how maximum high ceiling or wall, possible we can use bounce technique?
Thanks Neil
Dendy .. it’s impossible to give a specific answer.
It depends entirely on your aperture, your choice of ISO, how powerful a flashgun you have, and how close you are to a wall.
Neil, i’m new beginner photographer. What you mean zoom flashhead out to maximum that is 24mm or 105mm on Canon 430 EX II?
Thank you so much Neil.
Play with your speedlight and watch the distance scale change as you zoom your flash-head. But for this test, keep the flash-head pointed forward so that the distance scale appears. (It disappears when you put your flash in a bounce position.)
You will see that at 105mm (or whatever is the max zoom setting for a particular flash), that you have the most range. In other words, you effectively get a little more power from your flash when you zoom it to max. This does help when you bounce your flash.
Hi Neil, i’m little confuse about metering ambient light, you said you always keep the ambient light under exposure about 2 stop or more and then you use ttl flash to bring up the exposure on your subject, what and where the position you metered for you ambient light your subject or your subject’s background? Thanks Neil
Anton, I’m not sure where you read that I said I “always” keep my ambient light 2 stops under-exposed when I use flash?
In any case, here is an article on the decision process on balancing flash with ambient light.
Neil, what your’s ttl setting Average or Evaluative on canon camera when you bounce your flash?
Thanks Neil
Andi .. here is how I approach the Average / Evaluative TTL flash settings on Canon.
Hi Neil,
I have a question about bouncing the flash from a wall. Last week I did a wedding in a very small room with a red colored wooden ceiling but with wihite walls. I decided to try bouncing flash of this walls, but I was very close to the walls (about 50 cm to 1 meter or so). The light was still very hard. Is it because I was to close to wall? Is there a miniumen distance to bounce from a wall? Thank you for your help!
Alvin .. I wouldn’t say there is a specific minimum or maximum distance. But the closer you are to the wall, the smaller your light source will be. (Don’t think in terms of your flashgun as being your light source any more.)
The best you can do is look at the area you’re bouncing your flash off, while tripping your flash … and then decide.
But in this case, you were guided by how the photo look. That works too.
Hi Neil,
I have a question about bouncing the flash. Next week, I will take photo in area a blue colored ceiling and cream colored walls with tungsten lighting. There is still possible if i use bouncing technique or i must use direct flash to get more natural color on my photo, Thank you for your help Neil
I would still bounce the flash, but try to mostly use the walls. The essential thing here is that you have to shoot in RAW.
Hey Neil,
There are times when the room’s walls and ceiling is just too dark-colored, or made up of glass, and will not allow me to bounce my flash around. If I were to use a bounce card/bouncer to stick onto my flash, how big would it have to be? (inches)
… I hope you can help me with this.
Yes, Neil…had a perfect example of the ‘sometimes it just isn’t possible to use bounce flash’ occasion last night when I turned up to the nightclub venue to shoot a 50th birthday party and found that the floor, walls and ceiling were matt black. Any flash directed at any surface and the light just disappeared. It was like firing the flash into a sponge! I had no choice but to use direct flash but just made sure that my settings were aimed at optimal exposure without the flash being overly obvious. The results – pretty damned good. My reputation stays intact and my images still outshine even the best of those taken on mobile phones!
Hi Neil,
I had a quick look on here but couldnt find an answer to my query.
I’ve been asked to do some event photography which will be in a bar / night club. This particular location will have high ceilings and with the number of people that will be gathered there, bouncing the flash will be difficult.
I’ll be armed with a Canon 430EX speedlite and a Canon 50D, do you have any advice on what I could do to get reasonably flattering lighting on the models (it’ll be a fashion / runway type event).
Hello Neil
when i hold my D3S on Vertical position iam experienceing a problem with bounsing flash over my right shoulder how do you deal with such situations? positioning the subjuct to the left side and bounse the flash over left shoulder? pls help
Anoop
Hi Neil, a bit off-topic here but regarding the 3rd pic – do you have any advice about focusing on very low f-numbers? How on earth can you pull it off with moving subjects and is it something that you can achieve consistently? Is the solution 10fps??? I assume you focus and recompose. I find I have too many OOF shots with my 50mm at f/1.4 …
Hi Neil, I am from Nepal – a poor but small and very beautiful country in South Asia – country of Mount Everest. May be I was late to discover your website but now after having discovered it, I have gotten addicted to it. I ve learnt so many things which I could ve never learnt otherwise. I am a beginner and I mostly click pictures in either P or A mode ( I got Nikon D70s – 18-105 mm lens and SB600 flash ). But I m not fully satisfied with my exposures which I think are either slightly underexposed or over exposed most of the time. So, now I want to switch to manual mode for which I would apprecaite highly if you could reply my following queries :
a) How do I decide upon what aperture and speed to get the perfect exposure? I just want to click the sharp and perfectly exposed pictures like you do.
b) If my camera’s meter shows f-5.6 and speed 1/40 as correct exposure inside a room and now if I want to add flash to my subject, what changes in aperture and speed shud I make for the correct exposure? Coz flashes would definitely be too bright
c) In your examples, I ve noticed that in flash photography, in some pics you use speed of 1/250 and in some pics even as low as 1/6. So, please advise when to use such a low speed like 1/6 and fast speed like 1/250 when using flash.
d) Can your book be delivered in Nepal too if I order it?
I am a very eager student who want to excel in photography and you valued guidance and advices would be highly appreciated. Thanks once again.
Hi there Suraj … thank you for the kind comments.
About your exposures .. you do shoot in RAW? That’s the only option if you want more control over the post-processing of your photos.
Regarding your questions …
1. It is a matter of finding the correct exposure
– at an aperture that gives you enough depth of field,
– at high enough shutter speeds where you don’t have unwanted subject movement (or camera shake), (although you can go quite low on the shutter speed if you’re careful)
– at an ISO that gives you the image quality you need, for the size you are going to use the image.
b. Use TTL flash … and then you can use nearly any setting of your choice (while you under-expose the available light), and your camera and flash will take care of the exposure. If it is too bright, dial down your flash exposure compensation.
c. See the links in answer a.
d. I’m sure the US postal service ships to Nepal. I can’t see why not.
Thanks a lot Neil for bothering to reply.. It was really really nice of you..After going through your links only, I started clicking in RAW.. I would definitely try to follow what you have advised… thanks once again..
Hi Neil,
I am french.
I recently bought your book (in english because your book is not translated yet, one day maybe) and I have improved my photos thanks to you.
I have a question when I bounce the flash with your black foam :
My flashgun employs auto zoom to cover a range of focal lengths from 24 mm to 85 mm, it depends which focal length I use.
So do I need to manually adjust zoom coverage with the black foam ?
In case I do, which one do I must select ? The widest (24 mm) or the closest (85 mm) or it doesn’t matter when I use the black foam ?
Thanks for your advice.
Lionel
Hi Neil. My wife bought your book along with a bunch of other photography titles a little while ago. I’m one to learn as much as I can from the internet, and when I recommended your blog to her, I happened to notice we had your book! Too funny. Highly recommend your book! And, great job on your blog.
I’m a total bounce over the shoulder convert. Took me a while to grasp that the camera can be on full manual and the flash would compensate in TTL. It’s amazing what these flashes can do even in ballrooms with 40′ ceilings.
I shot alongside a photog at a political fundraiser who kind of snickered a comment about my flash pointing the wrong way. Guess who’s got more photos on the candidate’s website?
Now to my question: Our next wedding/reception shoot involves a hotel banquet room with relatively low ceilings, so I’m not worried about power. Unfortunately, the house lights are CFLs (warm or “soft” lights to my eyes). The walls and soffits are a mustard yellow color, and the main ceiling panels are medium toned wood (kind of like a natural cherry). Any suggestions on how you might gel for that if at all? I shoot RAW and post in Aperture but don’t want to spend a lot of time fixing stuff lit by the awful ambient. I also have an Expo Disk, but rarely use it as it kind of slows me down during the course of the night (e.g. speeches at head table lit differently from the area where the B&G cut the cake).
Thanks,
Kepano
Hi Neil, Great information………….as always
Question, Have you ever used the ABBC ” better bounce” cards. If so what are your thoughts regarding the product. Possible use , on camera flash outside with nothing to bounce from ?
Hi Neil,
Last week I was shooting a wedding in a dark church with a high ceiling. Still it was possible to bounce my flash from the high ceiling. My settings were Iso 1600 and 1/40 + f 3.5 But because the church was so very dark my bounced flash was my main light source. I think that I used almost full power of my flash (ttl) to get the light bounced back from te ceiling at my subject.
In this situation I was getting some strange pictures where it sometimes looked has if I had used direct flash instead of bounced flash. That means these pictures where very over exposed looking, like 2 or 3 stops to much flashlight was used in direct flash mode.
The next day I did a test to find out what the problem was. I made pictures from my girlfriend at night in an open field where there was nothing to bounce flash. I tilt my flash straight up just like I did in the church and set the output in manuel mode at full power. A big suprise for me: despite the fact that my flash was pointed straight up to the dark sky there was a lot of flashlight on the face of my girlfriend. It looked bad and very much over exposed, the same effect as the day before in the church.
So this means that when bouncing flash from a ceiling and using (almost) full power of the flash (because of an very high ceiling) there is a lot of flashlight falling straight on your subject too!
What is your opinion of this? Looking forward to your answer and thank you.
Regards,
Alwin
Neil, in the “Christmas light” lite patio, you state that you’re using two stobes, one off camer to the left (I believe) and that is being fired by a pocket wizard and the main light in camera mounted or just off camera? Where is the other wizard, on camera or tied to the flash like the one we see with your 2nd camera girl with the famous Black Flag demo article? Are your stobes both set to manual? I believe that is the only way you can go once you take the flash off camera without a cord mount.
Let me know, as previously stated, love your work and the help you provide. Is your updated book due out next year a drastic change from your current one? read this one in 3 days… can you tell I’m hungary :-)
thanks
mike
Hi Neil,
Just wondering how you would approach the following scenario:
Fishing out in a canoe, in the middle of a lake (no glassy water and choppy enough that you cannot have too slow of a shutter speed). The other guy catches a fish and wants a picture taken – holding it far away in front of him so it looks bigger ;-)
What would be your advise on getting around the typical ‘documentation’ type direct flash shot? How/where to get enough indirect light when stopped down while maintaining a reasonable ISO setting?
Besides, there is obviously quite some limitation regarding the bulk of the equipment I can take with me and how much I can move around to set up reflectors…
Thanks,
Chris
Hi, Neil,
if clients want large size prints from their wedding, will u recommend D3s or other high mega pixel camera? thanks!
lisa
Hi there Lisa …
See this following discussion on the forum –
Neil, i did not use a bounce card or diffuser panel. Just pointed the flash upwards to the ceiling. You say it’s unlikely to get such bad light and over-exposure from a flash that is bouncing indirect light onto your subject. But I think that when using full power of the flash (Canon 580 EX II) and bouncing to a ceiling then there is a lot of flashlight that’s hitting the subject straight forward, like directc flash was used. Maybe it’s just the canon 580 that is showing this.. I don’t know. But has I said i did a test to confirm this and if you like I can mail you the pictures. The solution, by the way, is of course using the Black Foam Thing to block the light that is going forwwards. But that’s not the point here. It’s about a problem I think not may photograpers are ware of.
Neil
Fantastic update of an already great article, it’s really refreshing to see such good advice regarding on camera flash & the great results that can be acheived in the real world. We don’t all have studios to work in & off camera flash is not always practical. Keep up the good work, all the best for 2011 & beyond.
Neil
Thanks for this excellent article. Wish you a very happy & prosperous new year. I am sure this new year will bring more great topic/articles from your blog.
I did not understand this comment from your post above “I control the light from my on-camera flash, by flagging the light with a piece of black foam”.
If you were using your oncamera flash to bounce light, how is the above possible? Or or you referring to a remote flash bouncing light on to the subject and you have an oncamera flash to trigger the remote one.
Although I understand your reasoning for updating the photos and the blog, I must admit that I kinda prefer the wedding bias.
Imho wedding photography represents the pinacle of non-studio portrait photography – you’re on the fly, in all environments, with people having things to do and not just stand there for you to keep re-adjusting your shots… if you can make nice portrait shots in this environment, then you’ll be able to make great shots every where else.
Oh well, at least I have your book… Or maybe I should start saving the pages of your other posts onto my computer?
Hello Neil,
Thank you for all the very helpful articles you write. In many of the photo samples you use to illustrate bounced, on-camera flash onto a subject that more or less faces the camera, it seems you are using either an 85mm or 70-200 lens. This makes sense as to get a roughly 45 degree angle bounce off of a wall to the side of the subject, you’re going to be some ways away from the subject. My question is what is your bounce technique of choice when a shorter lens is required? Do you then opt to bounce behind you or still to the side, neither of which would not emulate that optimum studio softbox position? Thanks for any feedback.
Best,
Mark
Hi there Mark .. with a wider lens you can’t go for such specific lighting on a group of people. The reason why these examples here are with longer lenses, is that I wanted a close-up shot to show what *is* capable with bounce flash.
WIth a larger group of people or when you use a wider lens, bouncing the flash off over your shoulder is the better option.
Scroll down to comment #18 in this thread on dragging the shutter, to see an example. But there are numerous examples throughout this blog of bounce flash with a wider lens. For example, this article on using bounce flash at wedding receptions.
It is still the same technique as described on this page.
Love your bounce flash
However when called to take professional pictures (for money) of kids or people at home or in a hall. I can NOT afford to rely on bounce flash I must bring my own extra lighting in order to deliver a reliable product.
Bouncing flash gives you too many variables that are outside your control. Coloured walls and cellings, low cellings ,high cellings
Relying on bounce flash only, is not being fair to the customer.
It’s ok for the ocassional picture or to get you out of trouble but NOT for reliable consistant results.
Mike .. I would definitely agree. Appropriate techniques for the appropriate time.
Hi Neil,
Thanks again for a great article and some very convincing images. I have been experimenting with a hige bounce card (the size of a ping pong bat) and its been working really well.
Thanks again, keep up the good work :)
Hi Neil,
I am a huge fan of your blog, and I have had great success with using the BFT to create soft, flattering light in wedding and other scenarios.
One common scenario I have encountered is that the head table is frequently placed against a wall. While the bounce flash provides nice lighting to the subjects sitting at the table, the back wall often reflects much of the light back, and this creates a fairly flat looking photo. In some cases, it looks like there is no separation between the subject and the wall.
While there are obvious ways to light with off-camera lighting etc, have you come across a way to bounce in a more confined manner? I have played with the idea of using a snoot so that it would be a tighter beam on the ceiling, and hopefully a tighter, more confined bounce light. I realize this is terribly inefficient, but just wondering what your thoughts are and if you’ve found an easy solution. I have yet to try the bounced snoot.
Thanks
Alvin
Alvin, it has to do with a few things:
– how close you are to your subject. For example, if you shoot at 200mm in a large room, then it is tougher getting a close / tight angle with the bounce flash’s direction in relation to your subject.
– you’ll notice that I nearly always pose my subject *into* the direction of the light. Usually for short lighting of my subject. This does help in giving more dynamic shadows.
Also look at this recent post where I bounced my flash off the wall to my side.
I think the might just be the trick that you’re looking for here.
Hi Neil,
This is definitely the most informative website on photography I’ve come across. I like how you simplify things for the mass to understand. Please keep up the great work and I must say the incorporated example pictures tell a thousand words. I am still relatively new to flash photography but I am starting to get bits and bits the more I go through your website.
Just a very quick and basic question on the technical part of bounce flash: When I use bounce flash in a room that’s relatively dark (as in the flash will act as the main light source), I notice that the camera meter mostly always shows that the eventual picture will be grossly underexposed. What confuses me is that the outcome isn’t as underexposed as what the meter suggested. Dialing in some positive FEC lightened the picture up even more, but with the camera metering still showing mass underexposure. At least I am getting the result I want with bounce flash, but I can’t seem to work my way around why the meter shows what it shows, that is, underexposure. When I balance the meter to what the camera considers to be “good exposure,” through aperture, shutter, and ISO, the pictures come out overexposed. Any help on this will be greatly appreciated!
My gears: D3s + 24-70 F2.8 + SB-900
Modes: Camera Manual Exposure, Flash TTL, Manual ISO
Regards,
Charles
Thanks for your reply, Neil. So is it fair to say that I can somewhat ignore the camera meter when I execute a bounce flash as long as the picture itself turns out to be properly exposed?
Hi Neil,
Let’s cut to the chase, what would you do if the room (restaurant that is dim and has tungsten lights almost like candle light) has high BLACK ceiling, dark carpent, and the 3 side walls has mirror from waist up to about 2-3 feet from the ceiling? Also, the front of the room facing the road is all glass. I used your technique posted in https://neilvn.com/tangents/bouncing-flash-forward/ and the picture turned out to be underexposed. The subject close to me is somewhat OK. I just need some general idea of how to face this kind of situation. I don’t know how to post the picture that I took to show you what I’m talking about.
I played the technique in this post in the 10 W x 15 L x 10 H room, and the result turned out the same as the sample pictures are.
I know that you are (probably) extremely busy, but I would be nice to hear what your opinions and suggestions are.
Thank you in advance,
Ups
If there’s nothing to bounce your flash off, then you have to improvise.
This maybe a silly question but did you use and kind of diffuser while bouncing the flash in the pictures?
With these images, no diffuser.
My most commonly used light modifier (not diffuser), is the black foamie thing.
Hello Neil,
Thanks a lot. This proved helpful in my case.
Greetings from Namibia, Africa.
Gotlieb
Hello Neil,
Thanks for your great articles. I love your Flash Photography book too.
A quick question:
When you are bouncing an on-camera flash off a wall, isn’t the pre-flash metering for the wall as opposed to the subject? Since the light has to travel farther to get to the subject doesn’t it mean that the flash would lose power by the time it gets to the subject? If that makes sense, does that mean that I have to increase the FEC for better exposure?
Thanks!
Cyrus … the camera measures the amount of light from the pre-flash that is returned. So if the pulse of light is a certain amount less, then the camera knows to give that certain amount of light more with the actual burst of light that exposes for the subject.
So yes, there is light loss … but that’s the idea with the pre-flash. The camera will now be able to calculate what the actual main burst of light should be, for correct exposure.
Hi Neil
Thanks a lot for your inspiring videoos (on B&H) and helpfull books (I own 2). Especialy the flash bouncing tutorial is a big help. I’m not a pro shooter, but I do have some assigments (location, portraiture etc) and I’m getting some nice results (using the foamy thing).
I love your work! Which allways seems to bring out the best in the subject.
Small question. The other day I had to shoot a portrait bouncing of a wall to my right. I used a tripod. What do you do in a situation like that? I saw one of your photo’s where you bounced of a glass wall to your right.
Steven, The Netherlands, also Holland ;-)
Hi Neil;
I have read (and re-read) all three of your books and scoured this website but have a problem that I am not sure I have found a solution to yet. I am photographing a wedding this weekend and the venue is a downtown restaurant here in Toronto. The head table is going to be set up in a solarium (sun-room) on the second floor with glass walls curving into a glass roof directly behind the bride and groom. The only place to bounce my flash will be directly behind me at the interior wall. I will also have the option of using off camera flash in a Lastolite softbox and can flag my flash with the black foamie thing if I go with on-camera flash. But for the life of me I can’t figure out how to avoid a large white reflection in the glass behind my subjects with either on-camera bounced flash or off camera flash. Is there a simple solution to this problem that I am not seeing or am I just going to have live with that reflection? If the simple solution is to not use a flash I guess I will have to live with that but the ambient lighting in this venue less than ideal especially after dark.
Hope you can help but if not, thanks anyway for all the great help and advice you have already rendered me and all the other photographers who regularly follow your site. You are truly inspirational.
Ross
You will have to make sure your light doesn’t hit the wall behind you. As simple a thing as that. The solution might be more complex.
Even here, where I selectively bounced the flash with the black foamie thing, I had to make sure no light hits the wall behind me.
So you’d have to do something similar with off-camera flash, and flag the flash, or add a grid to it, to avoid the light scattering everywhere.
Thanks Neil. I did manage to find a wall to bounce my flash off which put the reflection in the glass far enough away from the couple that it did not register in my frame. The linked article will certainly help when I find myself in situation like this again. The most important thing I have learnt from your site is to think about what I’m trying to accomplish and not to be afraid to push the limits of myself and my equipment and not be bound by one specific way of doing things. Thank you for all that.
Ross.
Hi Neil,
I am a big fan of yours, have all your 3 books and your video tutorials on flash, must say teachers like you are few and far…
I have a question which has been bothering me and it is like this that at some places you suggest to underexpose the camera by near about a stop and then add bounce flash and at other places you advise to overexpose by almost 1.7 stops and then add flash. How do you decide which way to go, over or under. Feeling confused please help: (
Hi there! I would have to see that in context where I said to over-expose (by 1.7 stops), because it doesn’t quite make sense that you’d over-expose.
Unless, you are referring to this:
exposure metering for the bride’s dress.
If so, please please keep in mind that we are NOT over-exposing for the bride’s dress. We are exposing correctly. We do so by pushing up the exposure reading in our camera, but 1.7 stops to get to correct exposure for the white tone.
In this case, the ambient light will be correct, but we can still add some fill-flash just to reduce contrast. TTL fill-flash is the easiest, by dialing the FEC down.
Let me know if this makes more sense now?
Thanks Neil, yes exactly there, where the bride’s dress is white you suggest to take the meter reading up but wouldn’t you underexpose the scene by a stop and then add flash to lighten the subject.. so how do i decide to take the meter up or down, is it based on the dress color of the model? Thanks
No, you don’t directly take the actual color of the dress into account for your exposure metering.
Instead, figure out the tonal value, i.e., whether you’d place it on a B&W scale as white / light grey / dark grey / black, or somewhere inbetween.
Check this article for a more thorough description:
Exposure metering: under- and over-exposure, vs exposing correctly.
You will do well to read a book or article on The Zone System. This is at the heart of exposure metering.
Should flash zoom be in auto? Do you beam the flash wider in the softbox than if bounced off ceiling on camera?
I’m confused as to whether the flashpower is stronger zoomed at 24mm or 105mm.
Thanks
Jubar
I normally keep my flash-head zoom to max or close to max. This of course is necessary when I use the Black Foamie Thing as a flash modifier, or else too much of the light is eaten up by the black material.
I find your website so helpful. I appreciate all of the great info here, as I have begun shooting weddings as a second shooter. I have been bouncing my flash for some time, so I understand it fairly well, but I’m not sure what to bounce it off of when I’m in a space with high ceilings and no walls. On your post about flash brackets, you have a photo of a bride and groom dancing, and you said that you had bounced the flash. I was wondering if there was a wall nearby that you bounced it from? I am hoping someday to be able to manipulate my flash better. I’ve not found a flash diffuser that I’ve loved yet, (although I haven’t tried your black foamie thing yet!)
Pam .. I often bounce into very large venues, and rely on the flash to help with the overall exposure, by going to high ISO settings. Here are some examples:
Hi, Neil.
My first time posting here, all the way from Cape Town, and I know you are from around these parts. I’ve found your advice very useful and easy to understand. I also own your first 2 books.
In some of your posts, you mention that you would only use direct flash indoors as a last resort. However, I don’t think I’ve ever seen you post an example of this. Have you ever done it before?
I have done this in a few extreme situations, but I haven’t posted examples here.
They look exactly like how you’d expect – direct flash indoors.
Hi Neil
I’m working my way through your excellent book “Direction & Quality of Light”.
I understand the ambient light/flash combo and everything seems to work well when I use the flash in manual mode However with bounced flash in ETTL mode (Canon 600EX-RT/Canon 70D) many of my images are underexposed i.e. insufficient flash power. This doesn’t make any sense to me as I thought the camera would automatically adjust the flash output. I know the problem is not that I’m too far away and that the flash doesn’t have sufficient power as I can change to manual flash and get the ‘correct’ exposure. Are there any common reasons for this sort of problem?
Thanks, cheers
Dave (Perth. Australia)
Hi,
I had the same problem. Unfortunately it is a problem with 70D and lenses with variable max apperture, weird but true. I even asked Canon about it and they replied to use in non-ttl or use fel.
You can change your camera or use fixed max apperture lenses.
Best
BTW, I know it’s a long time since your post but i thought maybe it still can help.
I’ve found that Canon cameras under-expose bounce flash somewhat. So I start out with +0.3 or +0.7 FEC as my default. That’s my immediate “zero”, bumping up the FEC a little bit.
Try that, assuming you’re not out of the flash’s range.
OK, will give that a go
PS Thanks for the super prompt response!
Hi Neil,
Can you tell me what software do you use to process your raw files? NX-D or direct lightroom? And do you allways use the camera profiles portrait, standard or you shoot neutral?
Thank you.
I still use Bridge (with ACR) to edit my RAW files. The profiles that you shoot with, have no influence if you shoot RAW.
Hi Neil — first off, thanks for all these great “tangents”
My question is in relation to the two example images you’ve used above to demonstrate proper bounce flash. It is clear how you angled your flash to the side/behind/above etc. but how did you manage to still achieve the small white glow/sparkle within the subjects’ pupils?
Thanks again
If you bounce your flash properly, you will get those catch-lights in the eyes.
Neil, I have been reading alot about gelling, bouncing, and the black foam thing. When would one ever use a diffuser on the on camera flash?
Thanks
Konnor – I don’t see much much for a diffuser with a flash on your camera, unless the diffuser creates a larger light source. Most don’t. They just spread the light.
Also check out this video clip with the video comparing on-camera flash diffusers
Hello Neil
I really appreciate the time and effort you put into the blog and website, and you always have time for FAQ’s!
I do have question, after reading you books I adopted the BFT! it really is fantastic but as you say it doesn’t cover every situation. My question is as follows: I recently shot a wedding in an old Victorian green house, and to my surprise the roof well is beyond the reach of any flash/strobe unit and the event was going on in the centre so there are no walls to bounce off (plus the whole this is glass). On the evening I found it very difficult to get an acceptable exposure without resorting to high ISO’s and an F stop of 1.4. The only option for for flash would be off camera in a softbox/octabox which when shooting a wedding on your own is difficult to lug around.
I have bounced off glass like that with a good measure of success – Using High ISO settings with flash at a wedding reception, but the venue you show there is much larger. I think your most realistic option would be to use off-camera flashes.
The photo above was good from a bounce flash but the problem with bounch flash has no catch light in their eyes
I don’t know how you missed the catch-light in the eye in the examples here. The catch-light is distinctly there. I would go so far to say that if you don’t see catch-lights, you’re not bouncing your flash properly.
There’s a beautiful quality to the light in these portraits. Good advice from you here. I’ve often thought that people over complicate bounce flash.